Orientation
Honestly no huuge changes, still 5 phases and your aim is to score primary and secondaries. Just a lot of quality of life improvements. This primer just flags some of the main changes so that hopefully less things surprise you mid-game.
The new mechanics and reworks come first; then a basic rules and phase-by-phase quick ref followed by what you need to know about the our 2v2.
Quick fyi: gdm rules is a great resource to check rules without having to scour the pdf. It has the pdf and app rules and clickable links if one rule refers to another.
Main changes
If you read only one thing on this page, read this list
Each links to its section.
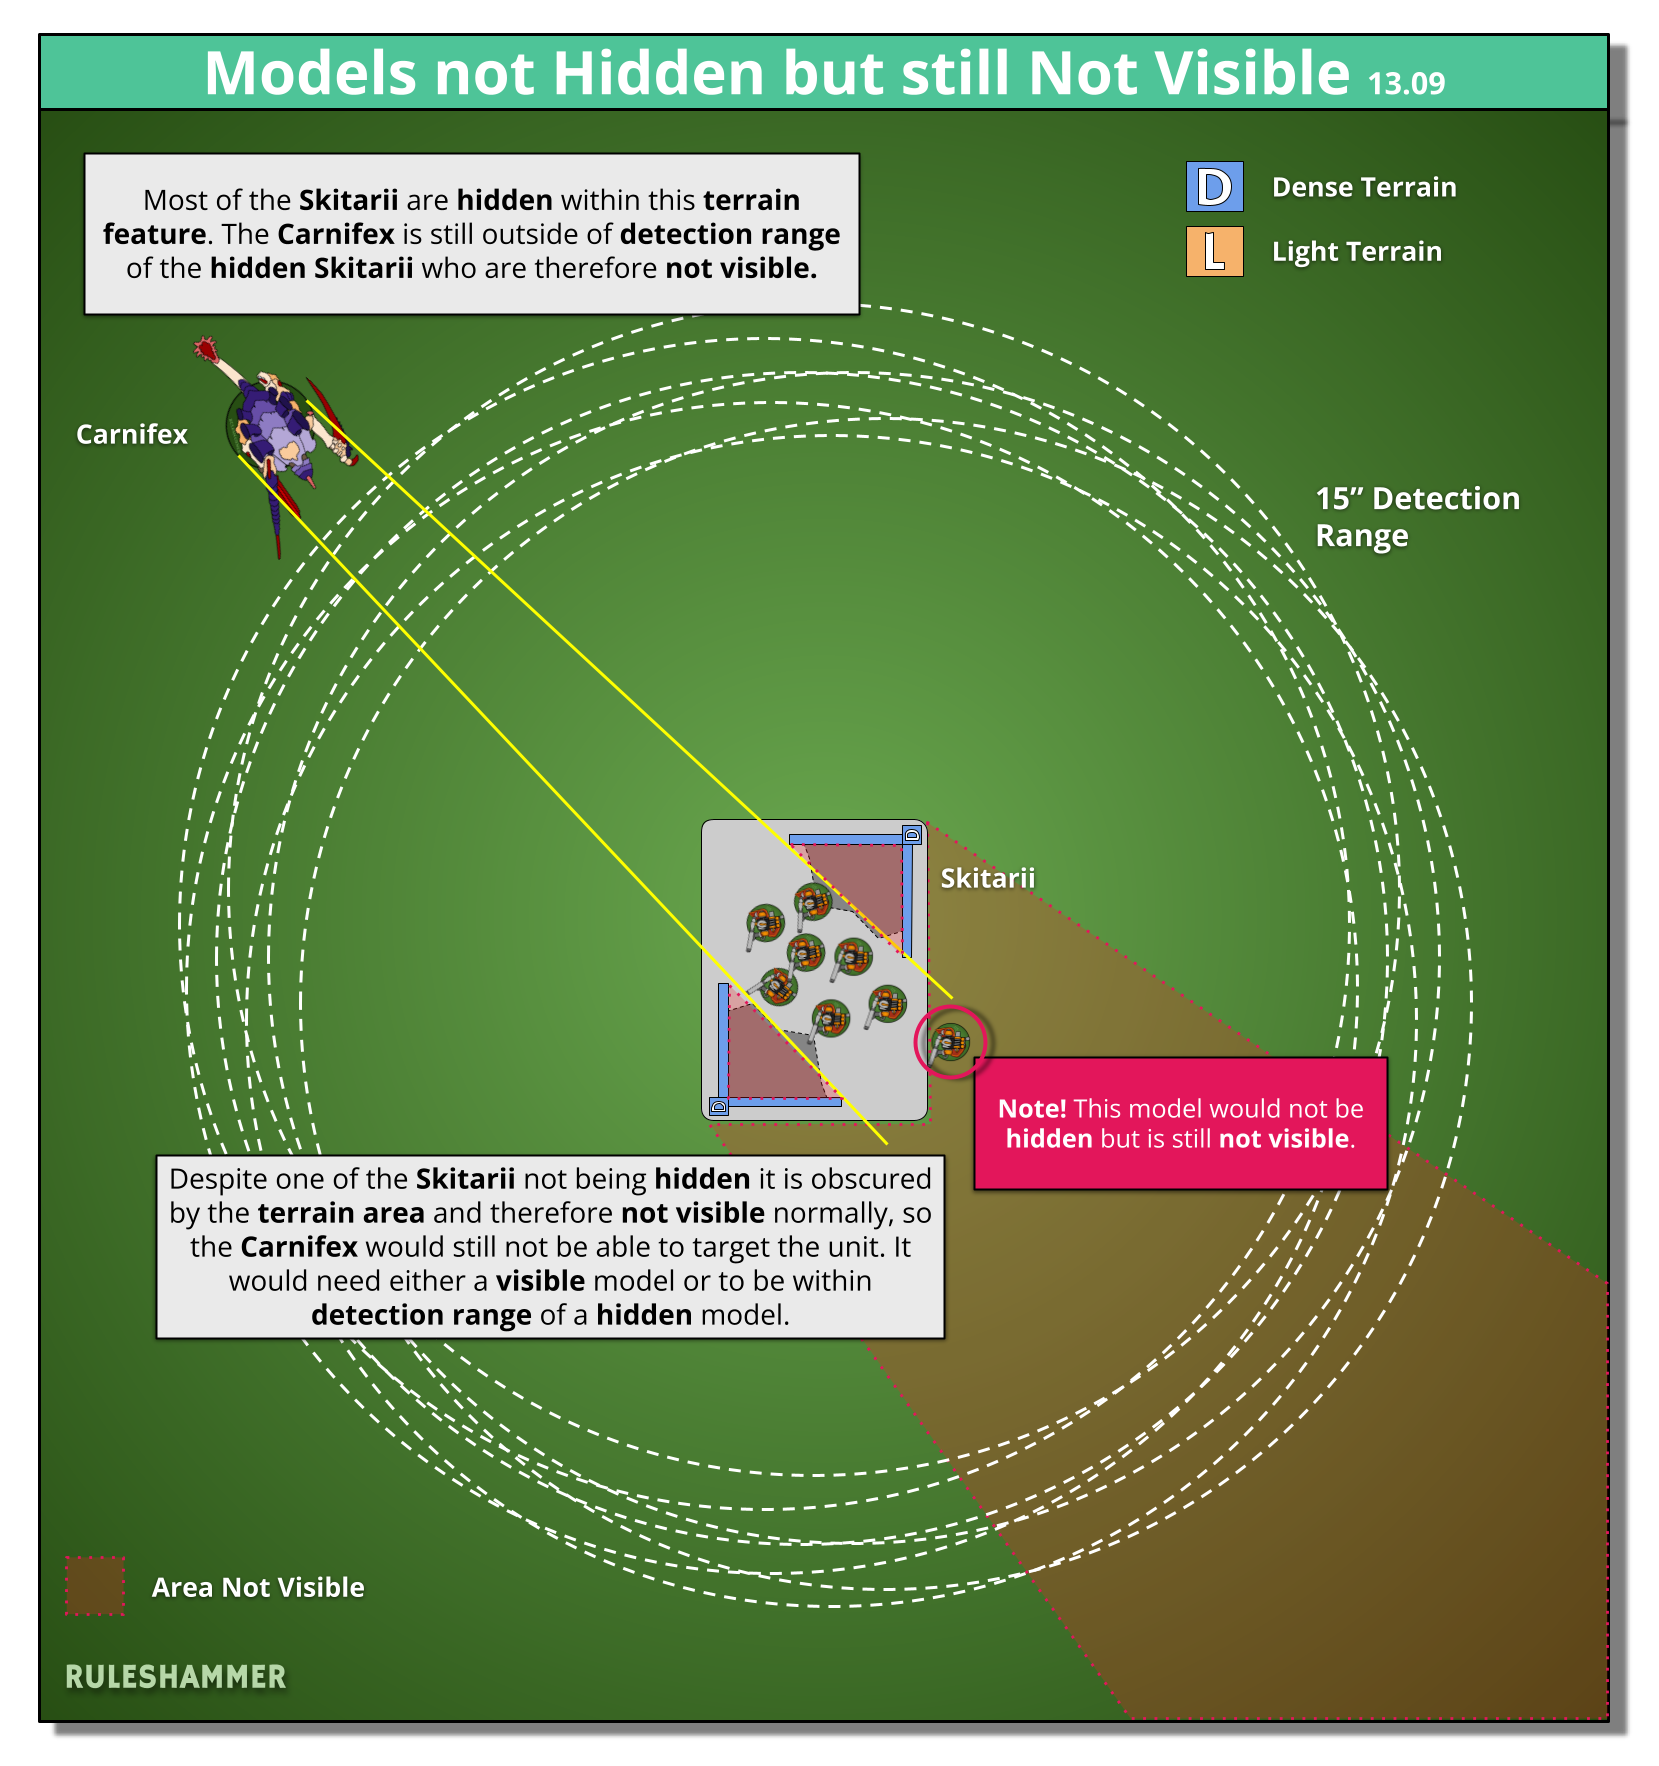
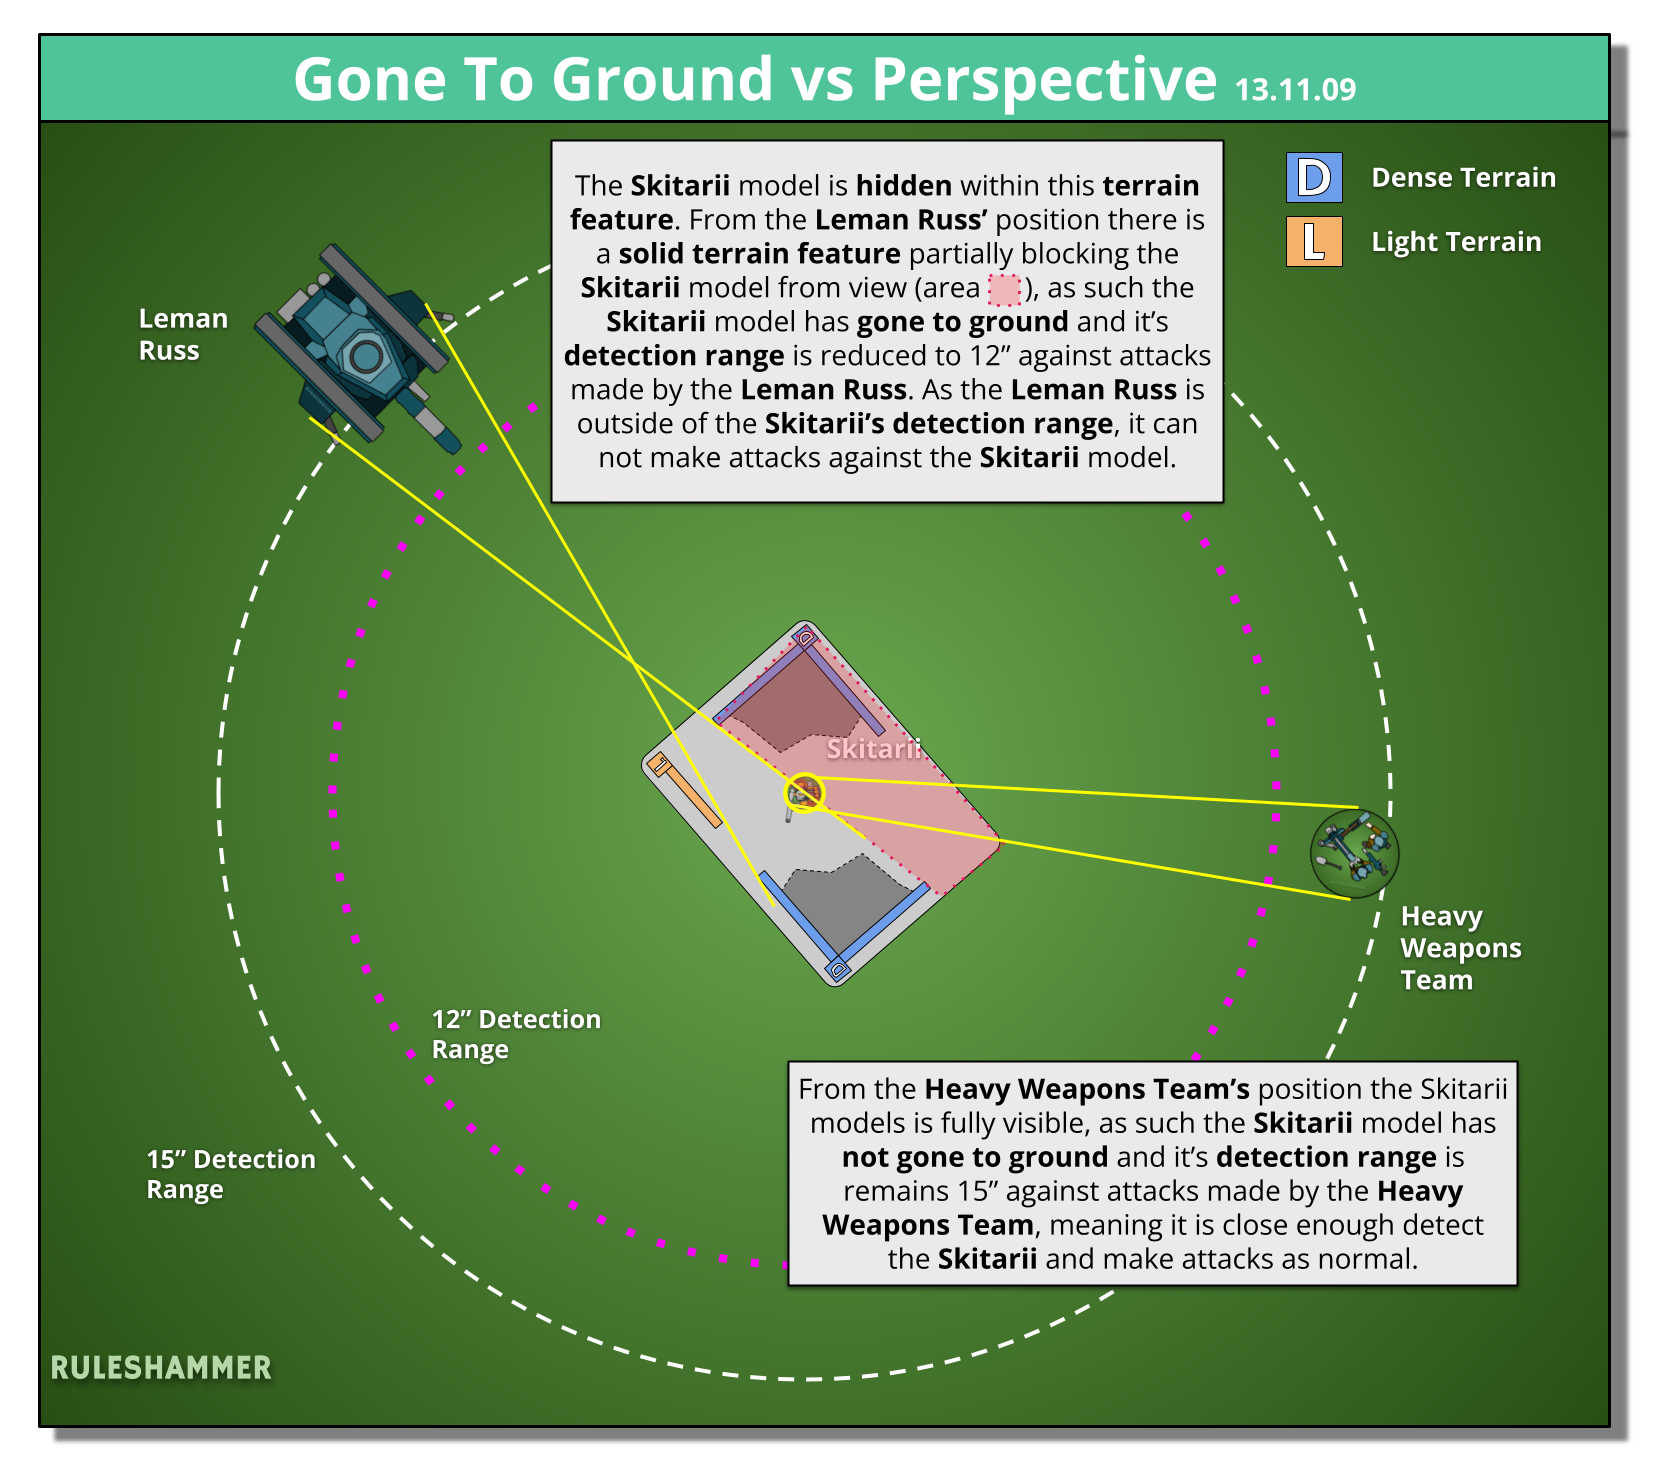
- Hidden & Gone to Ground — a brand-new way for light infantry to vanish in terrain. The marquee addition, and now the main way to hold an objective safely.
- Terrain has been simplified — Terrain is either Dense/Light/Exposed; Cover is now −1 to Ballistic Skill and not a save bonus.
- Fast rolling & wound allocation codified — Fast rolls are officially written in now and the main impact here is defenders must declare allocation groups before rolling wounds.
- A unit can only have one stratagem per phase — A big change here is you cannot use multiple stratagems on the same units each phase, meaning you can’t do stuff like activate Heroic Intervention, then re-roll the Charge.
- Overwatch — it is now exclusively triggered at the end of the movement phase. This didn't affect us much but now there's no "baiting" overwatch.
- Charging is roll-first — roll 2D6, then pick targets within reach. It is also now measured base-to-base. Because of this, Deep Strike is now 8" and you're still rolling a 9 to make a charge from Deep Strike.
- The Fight phase got an overhaul — First Everyone Piles-in, then Everyone Fights, then Everyone Consolidates. There's also an opportunity to overrun fight in the middle to allow more melee shenanigans. Engagement range is now 2" so it'll be easier to get more models fighting.
- Detachments & Force Dispositions — spend 3 detachment points to mix detachments, and your disposition decides which missions you play.
- Battleshock is slightly nastier — easier to trigger (at half-strength) and you must pass a test to recover, so it can last longer. This could be great for Nick's Patriarch.
- Coherency & engagement geometry — the 9″ coherency rule will affect general screening, also 2″ engagement range lets you move through enemies.
- Flying units can now "Take to the Skies" — a flat -2″ cost to move allows FLY units to move through any terrain or models.
Terrain & cover
Ruleshammer: Terrain Guide. I really recommend that you read this link to fully understand cover and visibility, and therefore also understand positioning better.
Terrain got a nice overhaul and instead of 10 different types of cover (and 10th basically only using the RUINS keyword anyway), we now have the following distinctions:
Features vs areas
- A terrain feature is the physical model — the ruin, the crates, the container.
- A terrain area is the mat or template footprint it sits within.
Whether a model counts as "within" terrain is decided by the area boundary; the feature affects how models move and visibility.
Note: this means you can toe into a terrain from the "outside" of a wall and contest objectives. This is intentional for the event companion layouts.
We’ve also purposely left space between a terrain feature and the edge of the terrain area to allow a line of models to be on the terrain area from the ‘outside’.
Three categories of feature
- Exposed — ground-level stuff like craters; no effect on movement or visibility.
- Light — low walls, barricades, pipes, small statues; no effect on movement, but can affect visibility.
- Dense — ruins, buildings, large containers, woods; INFANTRY/SWARM/BEAST move through freely; bigger models go around (or through any part under 2″ tall).
Dense features also have the Solid rule — you can't see through windows and gaps under 3".
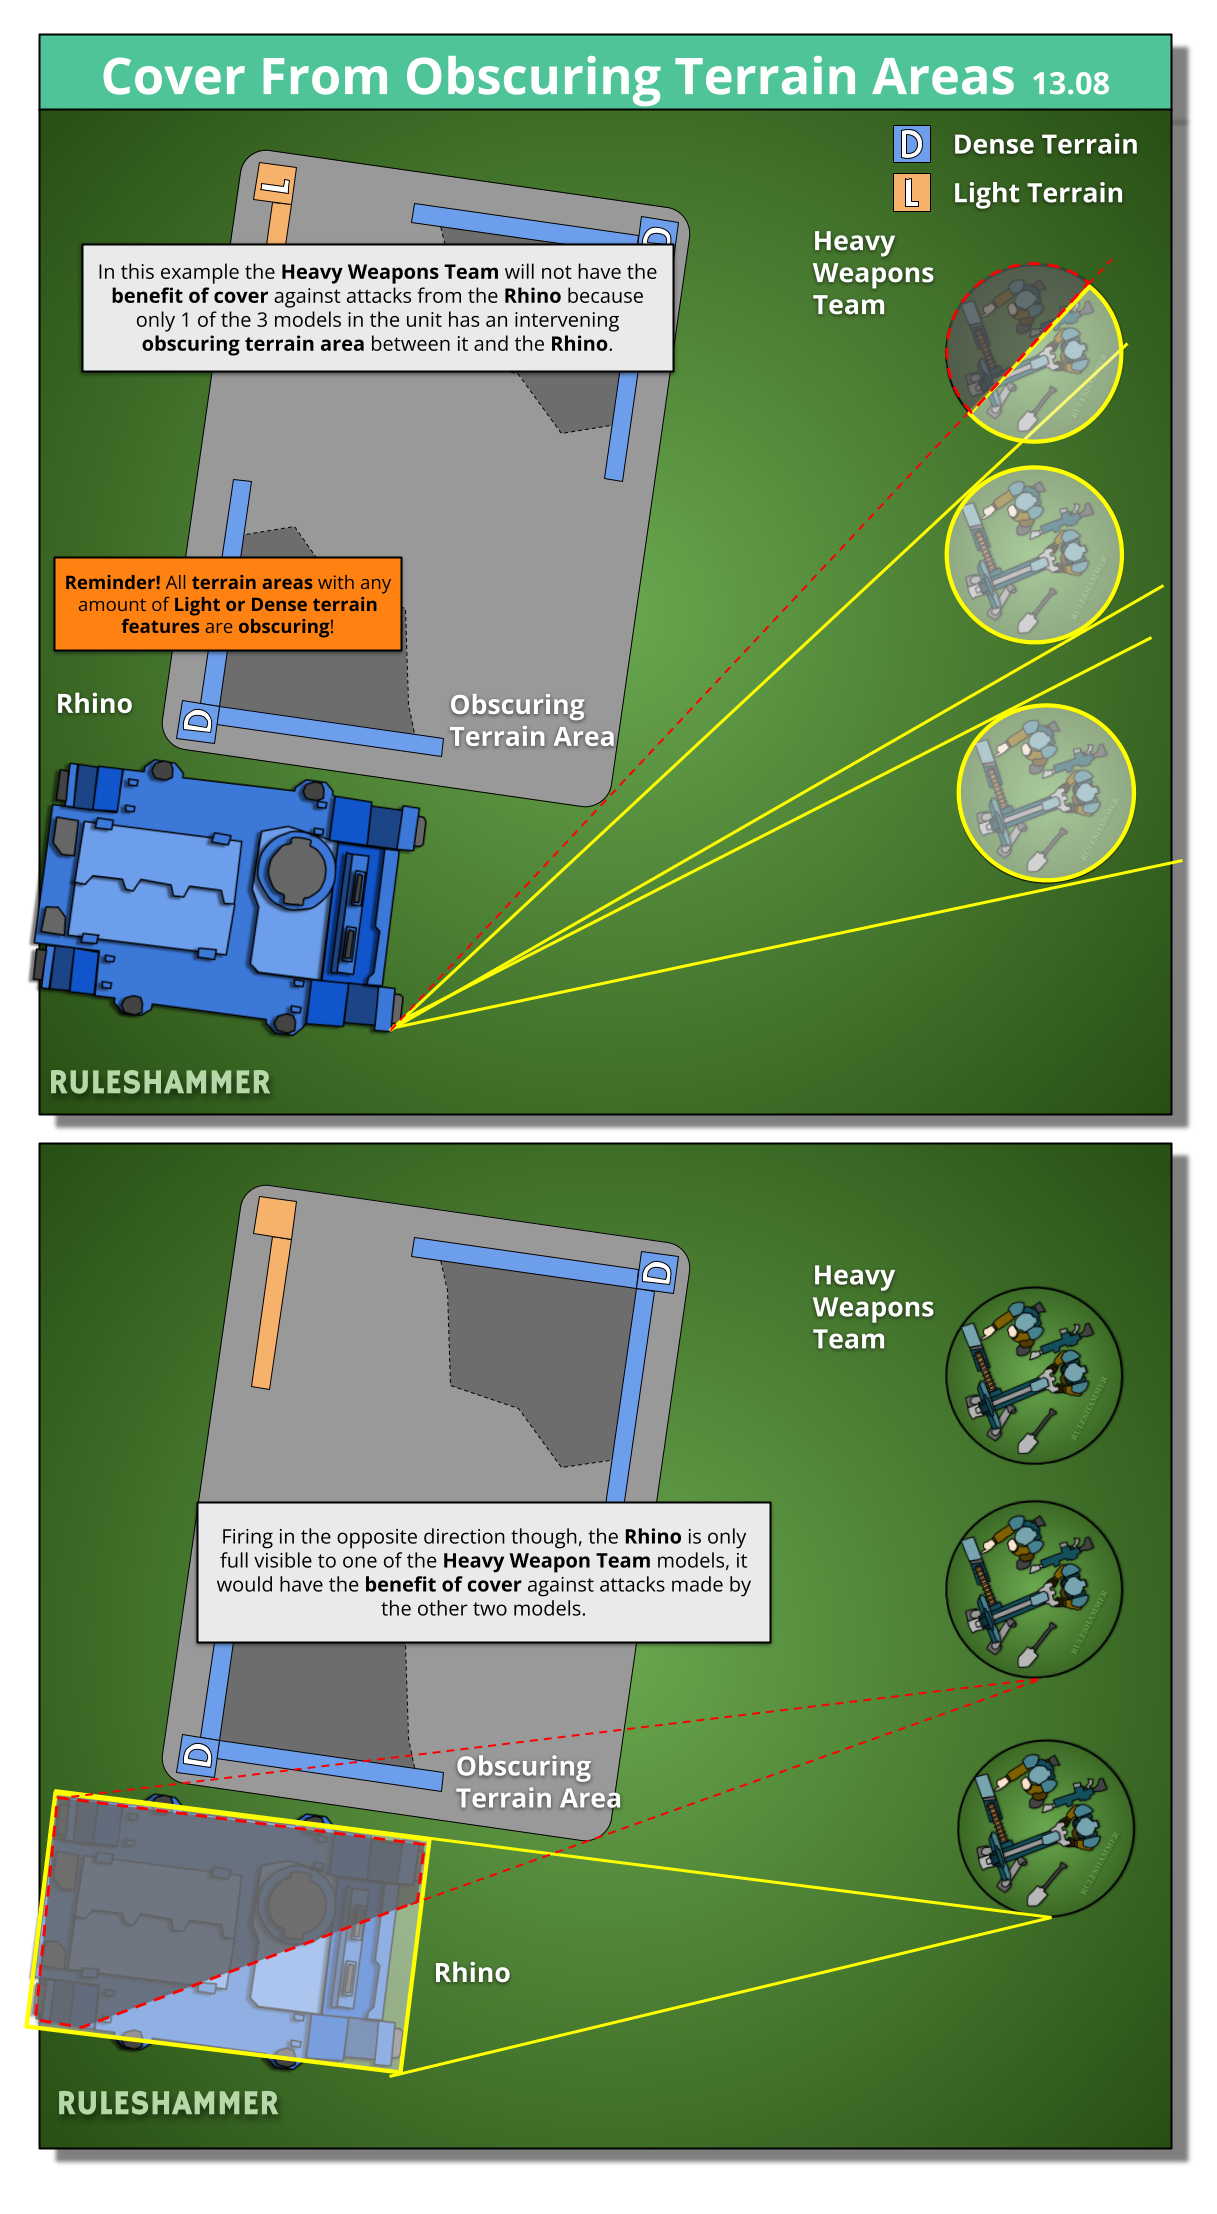
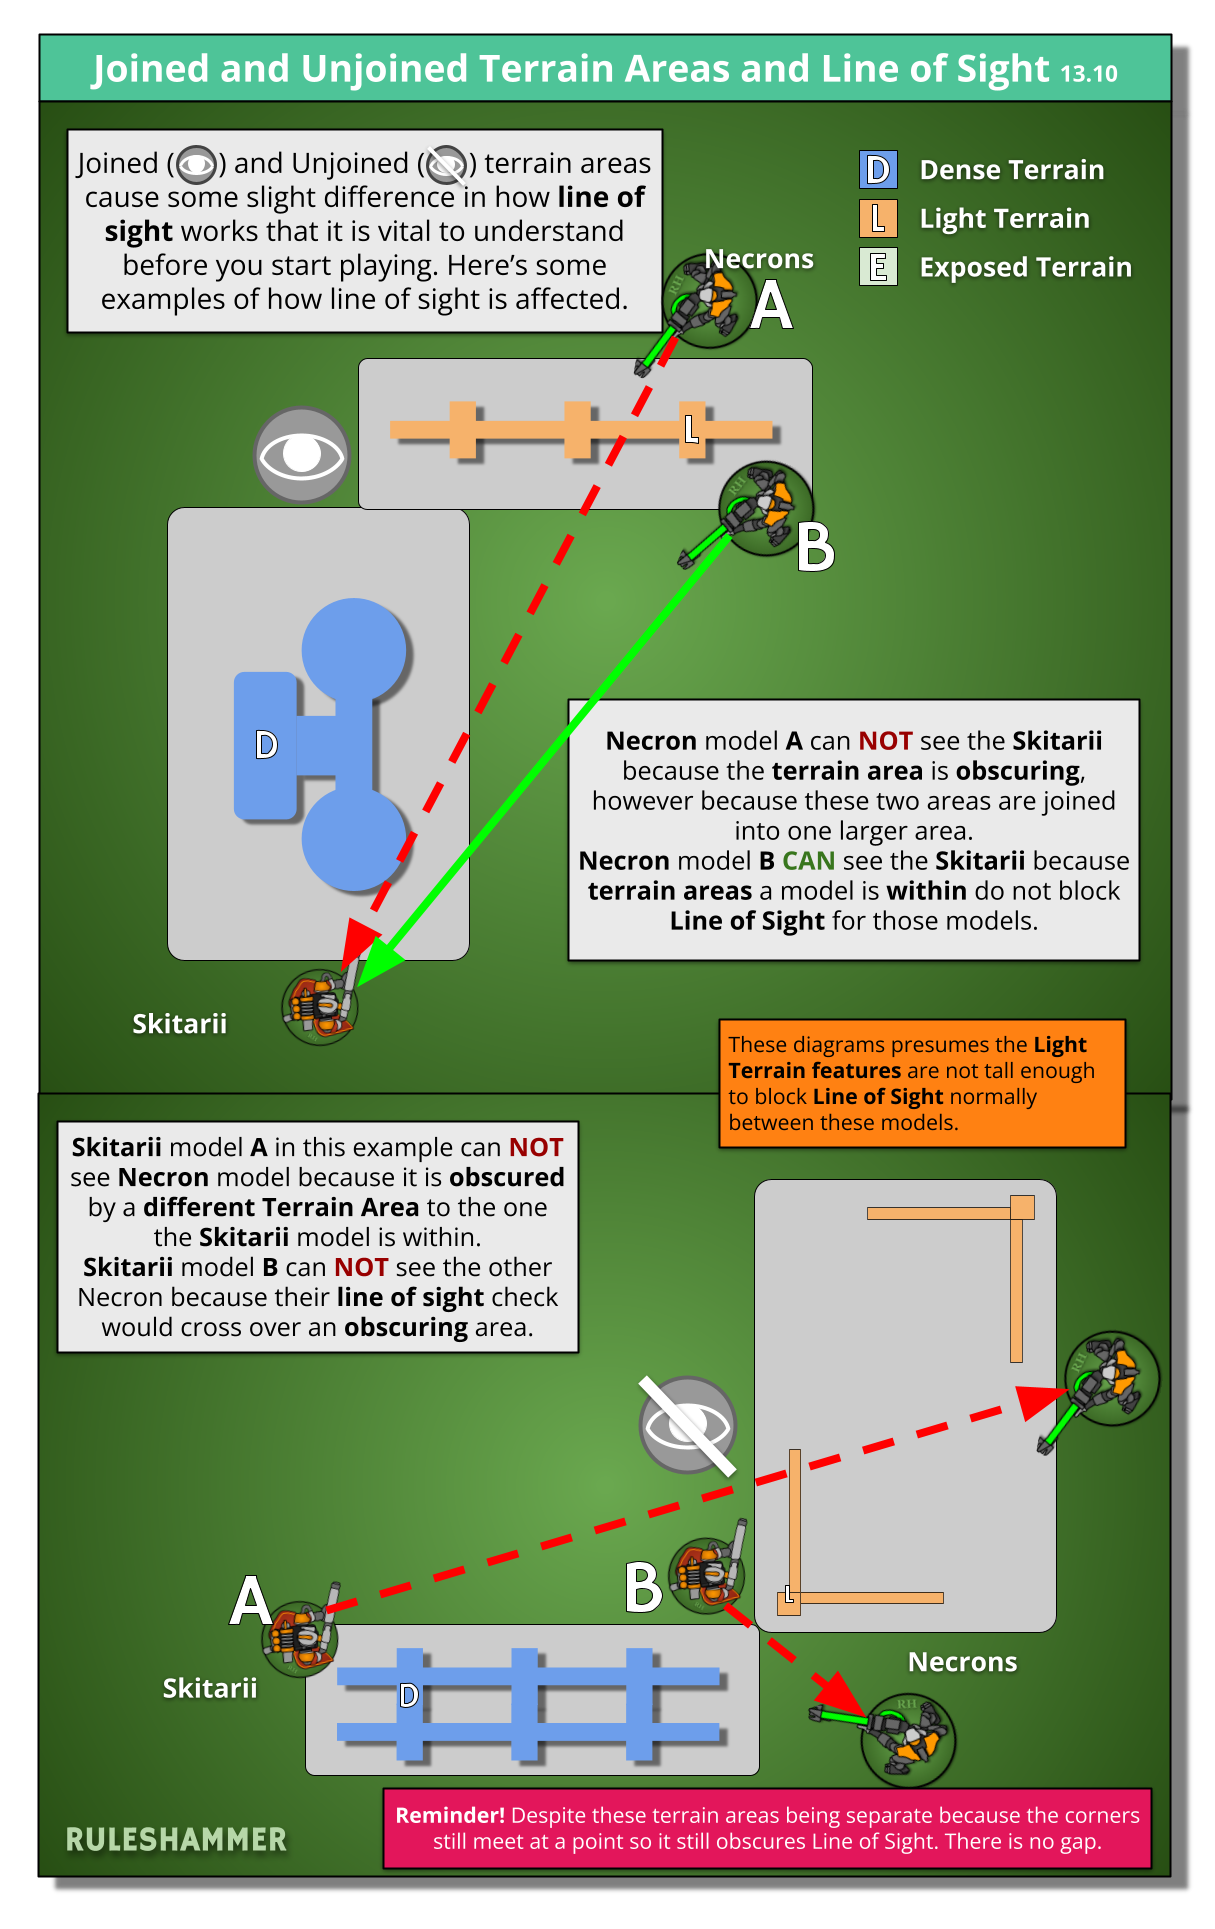
Any area holding a Light or Dense feature becomes Obscuring and line of sight cannot be drawn from either side.
Obscuring example
Two things to note for Primary/Secondary Missions
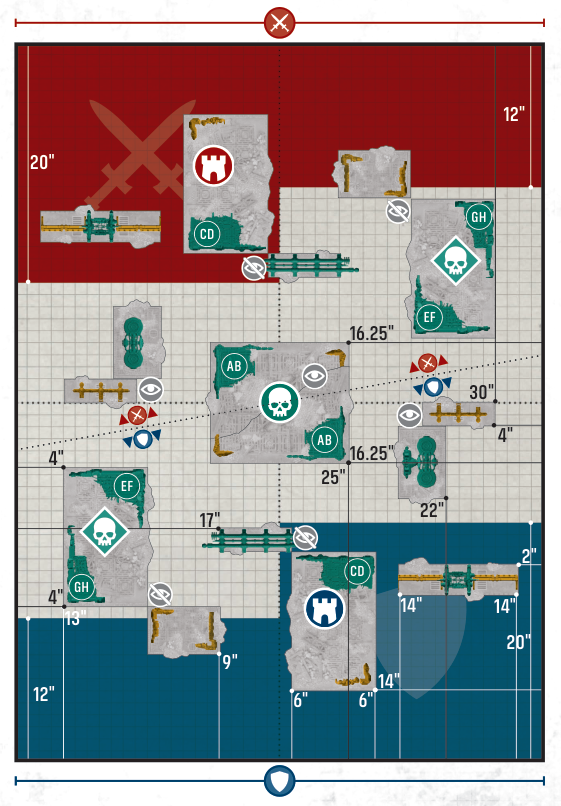
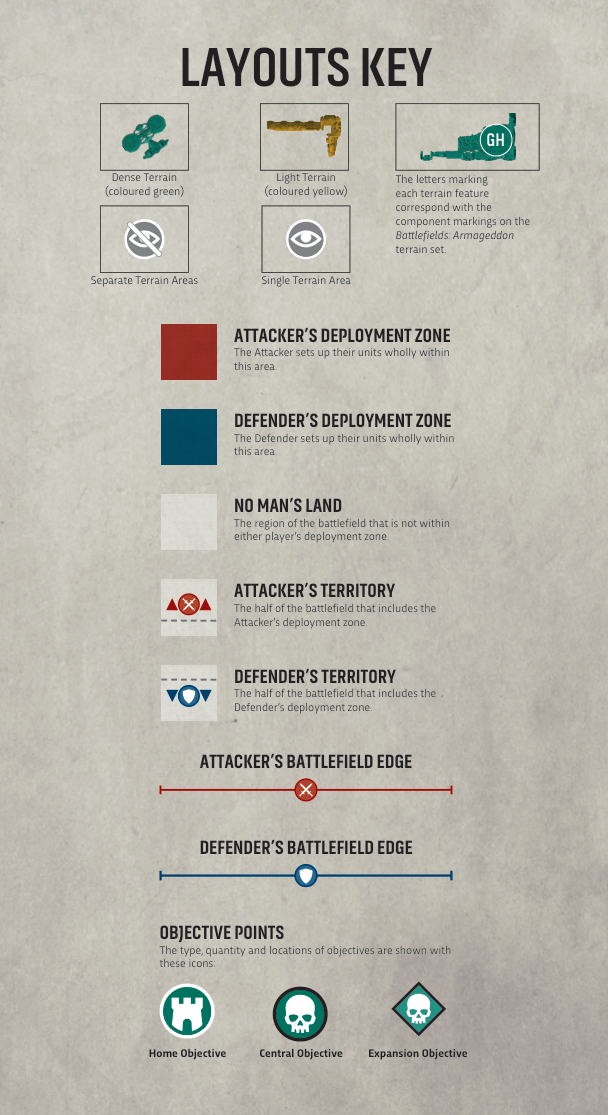
- Objective Types: Home, Central, and Expansion — Some missions require holding one or multiple of an objective type.
- Territories — The half of the battlefield that belongs to a player. Some missions ask to be present or do an action in a territory.
Also objectives are now terrain areas, not circles
See the below layout example with symbols.
Layouts Example
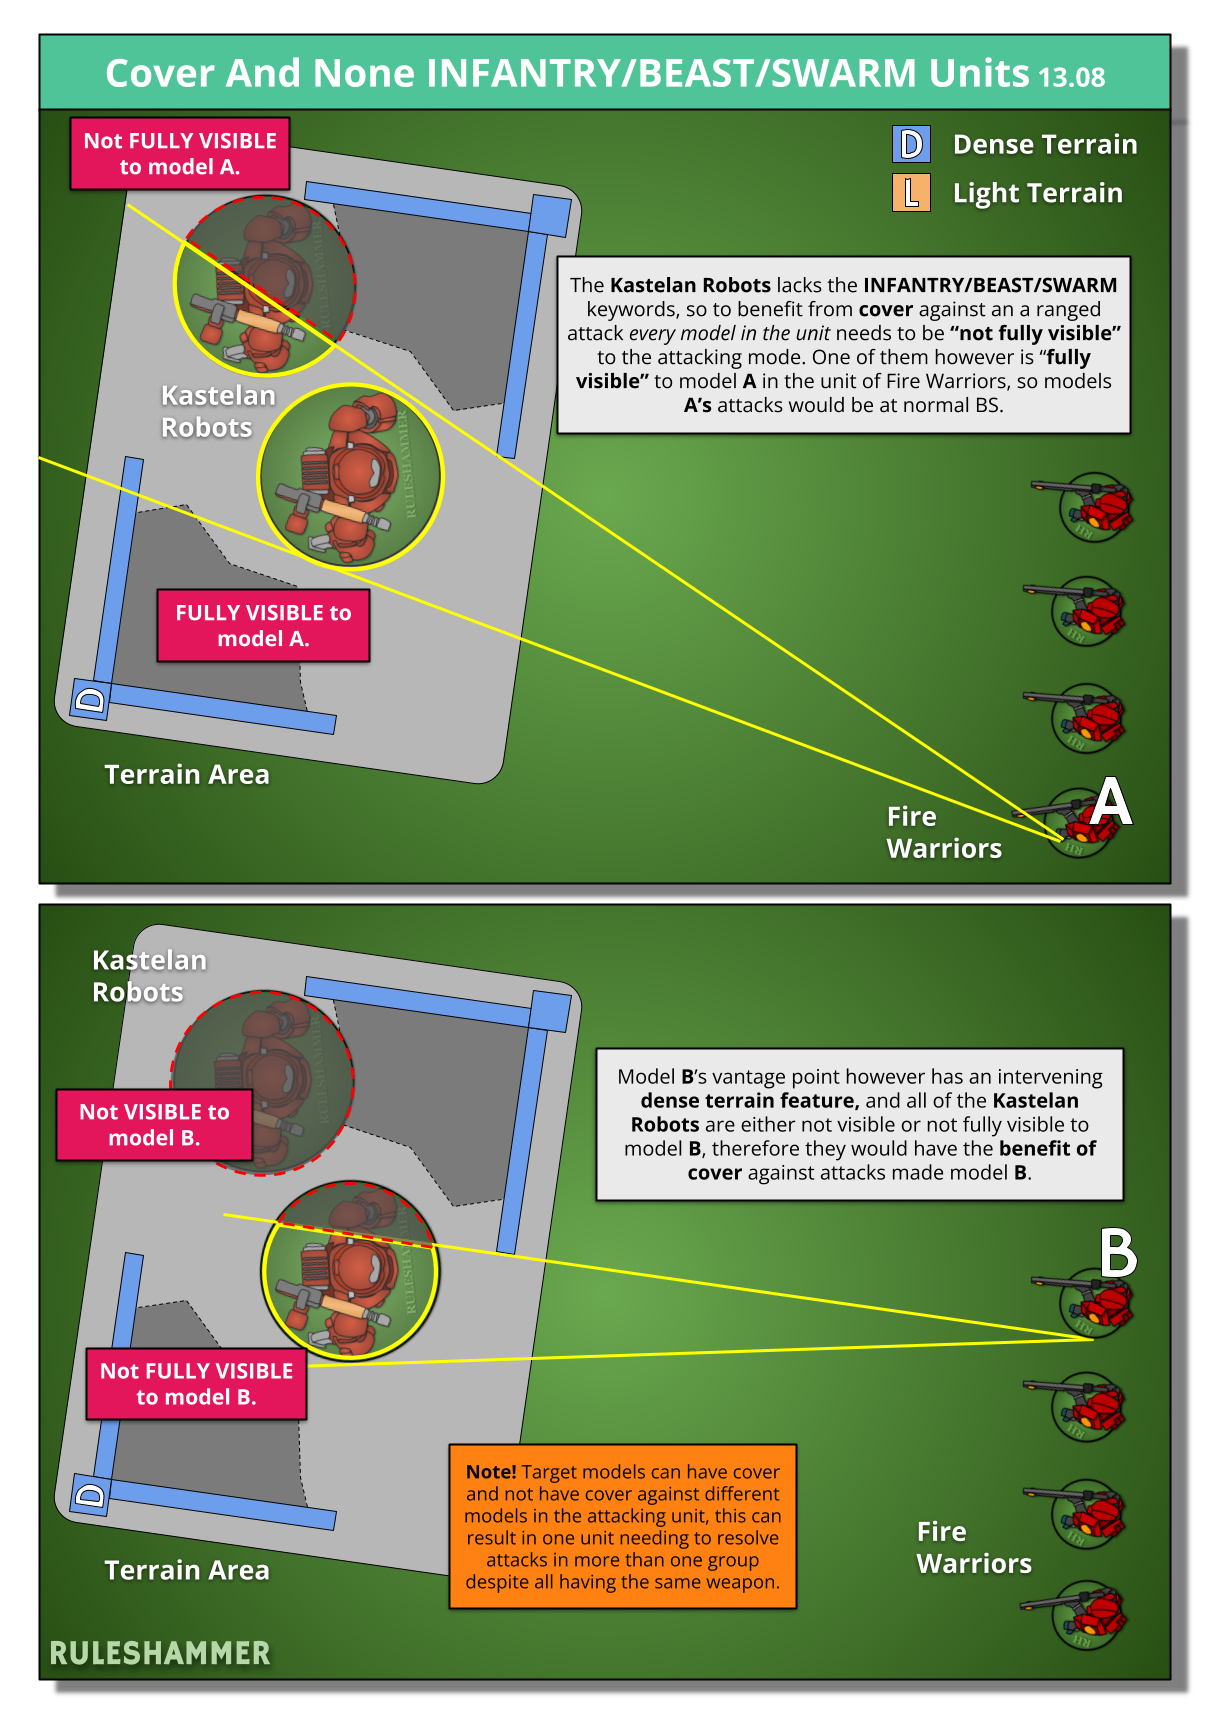
Cover is now −1 to hit, per attacking model
Each time a ranged attack targets a unit, if every model in that unit meets one or more of the following conditions, that unit has the benefit of cover against that attack:
- That model has the INFANTRY/BEASTS/SWARM keyword and is within a terrain area.
- That model is not fully visible to the attacking model due to one or more intervening terrain features and/or one or more intervening obscuring terrain areas. (See above obscuring example with the rhino).
Climbing & plunging fire
A model can move straight up and down a terrain feature to climb it, provided the following conditions are met:
- That model must remain within ½" horizontally of that terrain feature.
- Add the distance moved vertically up, and the distance moved vertically down, to any other distance that model has moved since its unit began that move.
Fire from a vantage point over 3" tall at a target with models on the ground improves the BS characteristic by 1.
Detachments & dispositions
List-building changed in two big ways: you can now mix detachments, and the detachment you build around decides which missions you'll play.
Spend your detachment points
Cheaper detachments carry a lighter rule and only a handful of stratagems and enhancements — some of which can now apply to non-character units (these are upgrades). It's a lot more flexible, with the obvious caveat that some combinations will be stronger than others.
Force Dispositions decide your missions
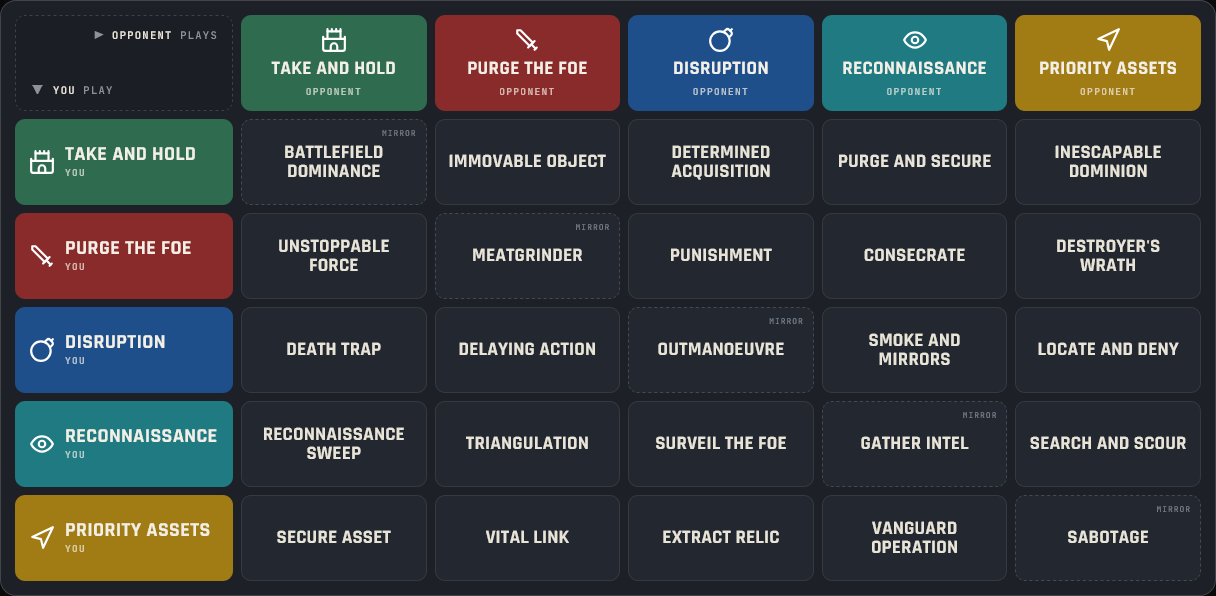
Every detachment has a Force Disposition. When you build your army you pick one disposition from among the detachments you took, and that determines the pool of missions you can play. There are five:
- Take and Hold — classic objective play, no actions. The only set that can reward holding your home objective. Go wide: bring lots of cheap, tough scoring units, because whatever sits on the centre will get shot off it.
- Purge the Foe — hold objectives and kill units. The most straightforward "just play Warhammer" option, and a strong one — it rewards what your army already wants to do anyway.
- Priority Assets — the most action-heavy; you'll want fast units with decent OC to grab points, perform actions, hold your expansion, and often pick off a unit a turn. Just don't over-stretch.
- Reconnaissance — get around the table: be in quarters or do actions in specific spots, rewarding fast, mobile MSU.
- Disruption — hit-and-run; small, fast, lethal units that trap terrain, move, act, and kill key targets. Never scores its home objective.
You and your opponent reveal dispositions before the game, and the pairing sets each player's primary mission — so the two of you are often chasing different goals. There are 15 possible combinations, so part of list-building is planning how your army will actually score whatever it draws. Primary missions cap at 45 VP; secondaries also go up to 45, and unlike 10th there's no hand limit, so you can sit on a secondary and cash it later.
Basic Rules
Not gonna talk about super basic stuff like datasheet details or keywords. Just going to mention some foundations we usually don't think about and details on the new attack/wound allocation system. Oh and 11th no longer has a movement cost for rotating a model.
Rules come in numbered blocks
Rules are now broken into discrete, numbered blocks (the same approach as the newest Age of Sigmar), so referencing a specific rule mid-game is much quicker, and common procedures follow a fixed template that reads the same every time.
Example
Emergency Disembark Move 18.05 will refer to "Make a hazard roll" as described in 06.03
Turn Structure
Turns and phases now have a defined Start and End step along with a defined scoring sub-step. Functionally, this won’t change anything for your games, but things can now get much more specific with timing to fix race conditions. This may get more involved once new books start coming out and rules reference these specific sub-steps.
Active and opposing player sequencing
This is a concept that's existed for a bit that’s a bit more codified now. If it’s your turn, you’re considered the “Active Player” which generally means you get to choose how certain interactions stack up if things trigger at the same time. Now though, if you’re in the middle of a move on your opponent’s turn or selected to shoot or fight you become the active player until those actions have resolved.
The digital rules also outline how the active/opposing players sequence rules that have identical timing (e.g. "at the end of the movement phase").
First, the active player does all their mandatory abilities, then selects and activates all their optional abilities. After that, the Opposing Player does the same. If any new rules are triggered by things either player does, those do not happen until all pre-existing rules have resolved.
Coherency
A unit is in coherency while both of the following apply to every model in that unit:
- Within 2" horizontally and 5" vertically of at least one other model in that unit.
- Within 9" horizontally and 5" vertically of every other model in that unit.
Coherency examples
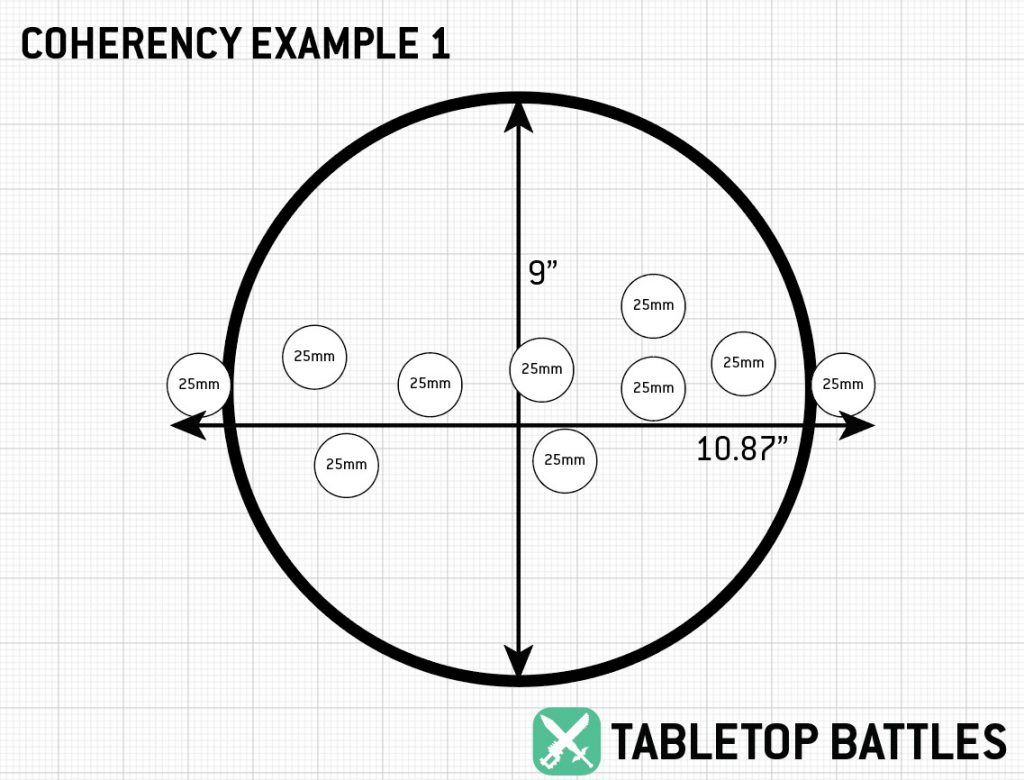
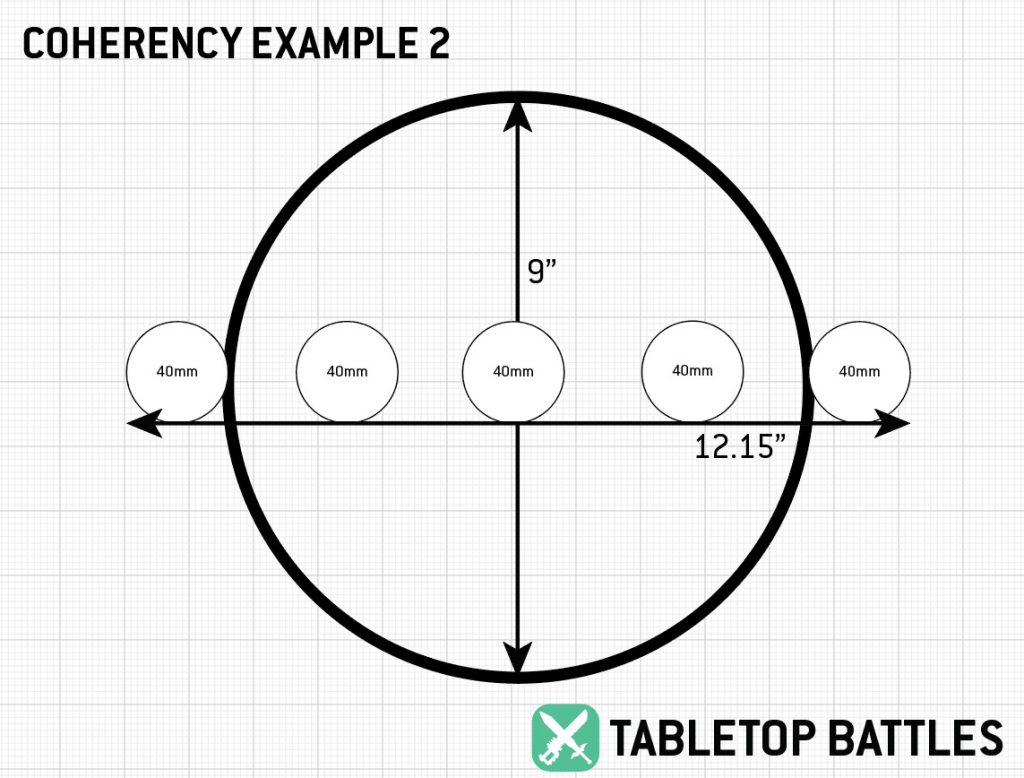
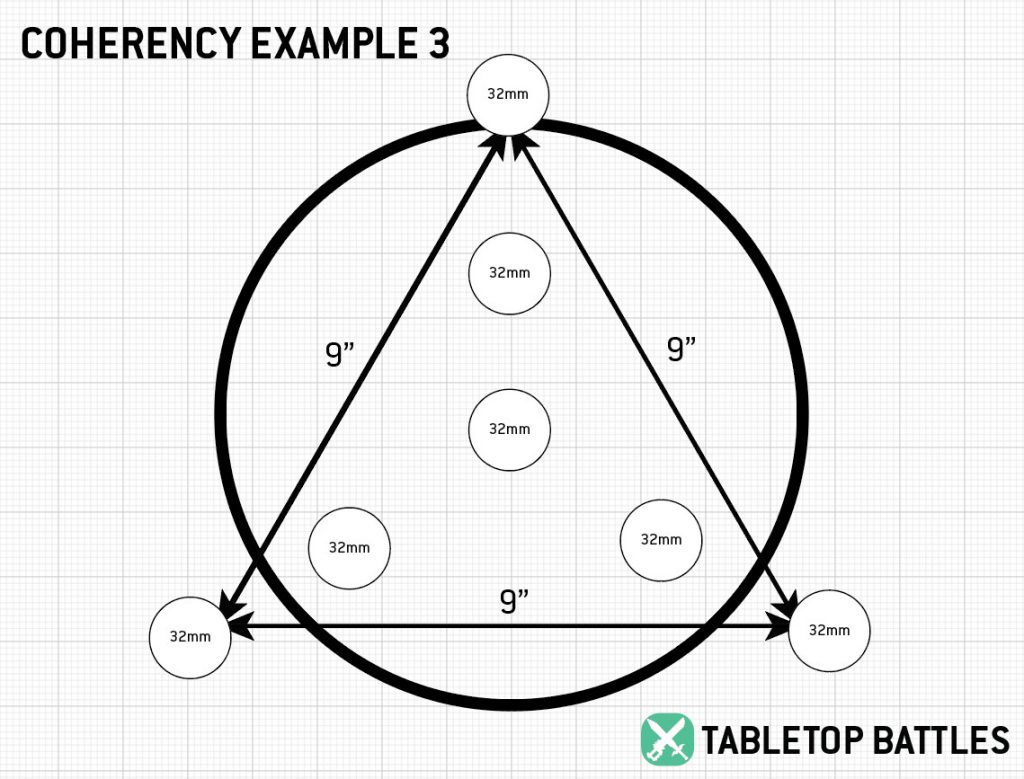
Also, engagement range is now 2"
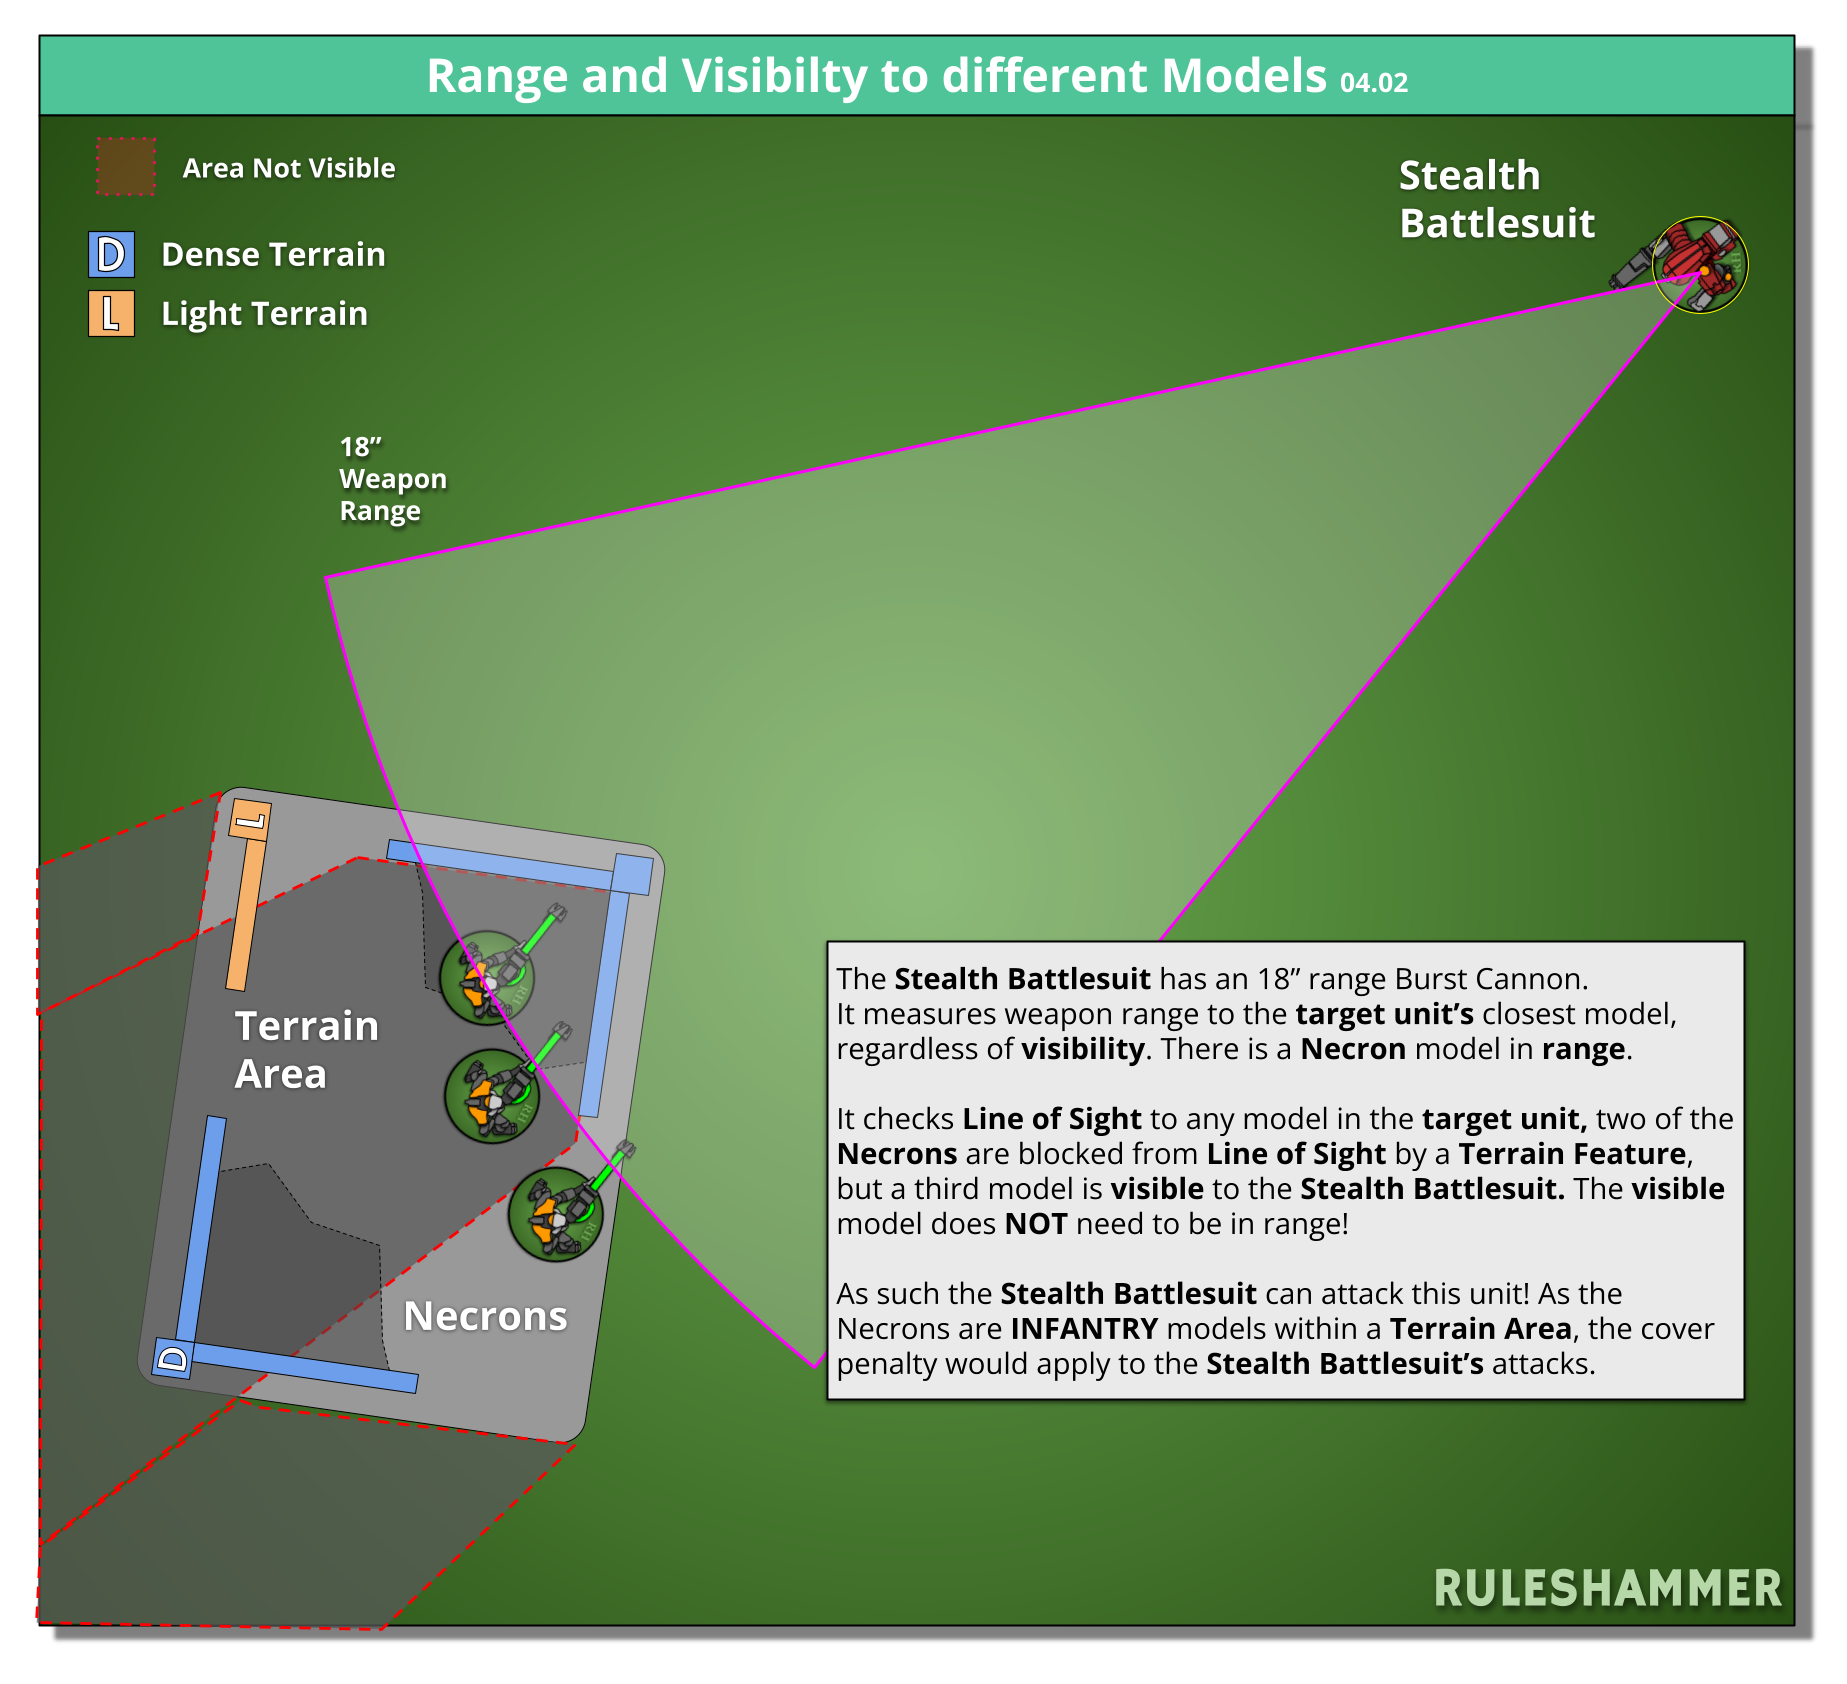
Measuring Distances and Visibility
This is something we've debated before and not necessarily done so consistently(?), so I want to draw a clear distinction:
- Distance is measured "to or from the closest part of a model's base."
- Visibility requires that "for an observing model to have Line of Sight, it must be possible to draw an imaginary straight line from any part of that model to any part of the model being observed."
While Shooting, these are two separate checks, and passing one doesn't guarantee the other — as in the diagram below, where the DISTANCE from the stealth battlesuit is measured to the closest Necron, but VISIBILITY is only granted to the third Necron.
Attacks, save groups, & allocation
The general attack sequence is largely unchanged:
- Select Weapons
- Ranged: Select one/more weapons to shoot with (except CLOSE-QUARTERS weapons)
- Melee: Select one weapon to fight with
- Select Targets, for each weapon:
- Ranged: with ref to the above image, select one target: within range, visible, and Unengaged
- Melee: the targets must be within engagement range and you cannot select more targets than the A characteristic. I.e. you can hit multiple units with one weapon.
- Resolve Attacks
Now, the resolve attacks section has one major change: save groups and allocation order. When resolving attacks, gather all the attacking dice needed for identical weapon profiles (BS/WS, S, AP, D, and abilities like lethal hits) and resolve the following:
- Hit rolls
- Wound rolls
- Save rolls
- Create save groups
- Declare allocation order
- Make save rolls
- Inflict Damage
On Creating Save groups and allocation order:
Create Groups: Divide all models in the target unit into the following groups, as many times as required:
- One group for each CHARACTER model.
- One group for all other models with the same W, Sv and InSv characteristics
Allocation Order: Declare the order in which those groups will have attacks allocated to them, applying all of the following:
- If a non-CHARACTER group contains a model that has lost one or more wounds, that group must be first in the allocation order.
- No CHARACTER group can be earlier in the allocation order than a non-CHARACTER group.
- CHARACTER groups containing a model that has lost one or more wounds must be earlier in the allocation order than CHARACTER groups containing no wounded models. I.e. if you have a unit with 2 CHARACTER models and 1 of them has lost some wounds, that one is earlier in the allocation.
Only once this is done should you then roll your save rolls. The defender rolls the number of saves equal to the number of successful wound rolls that the attacking player made, and you apply these save rolls from lowest to highest against your save groups.
Orks example
I don't think we have too much here to really pay attention to other than Matt has his Orks Boyz and Nobz that have different W characteristics. He has to declare the allocation order, e.g.: Group 1 Beast Snagga Boyz, Group 2 Beast Snagga Nob, Group 3 Beastboss.
Save Groups and Allocation Order (and Precision)
For more explanations: Ruleshammer Save Groups & Allocation Order, Feel No Pain and dX damage
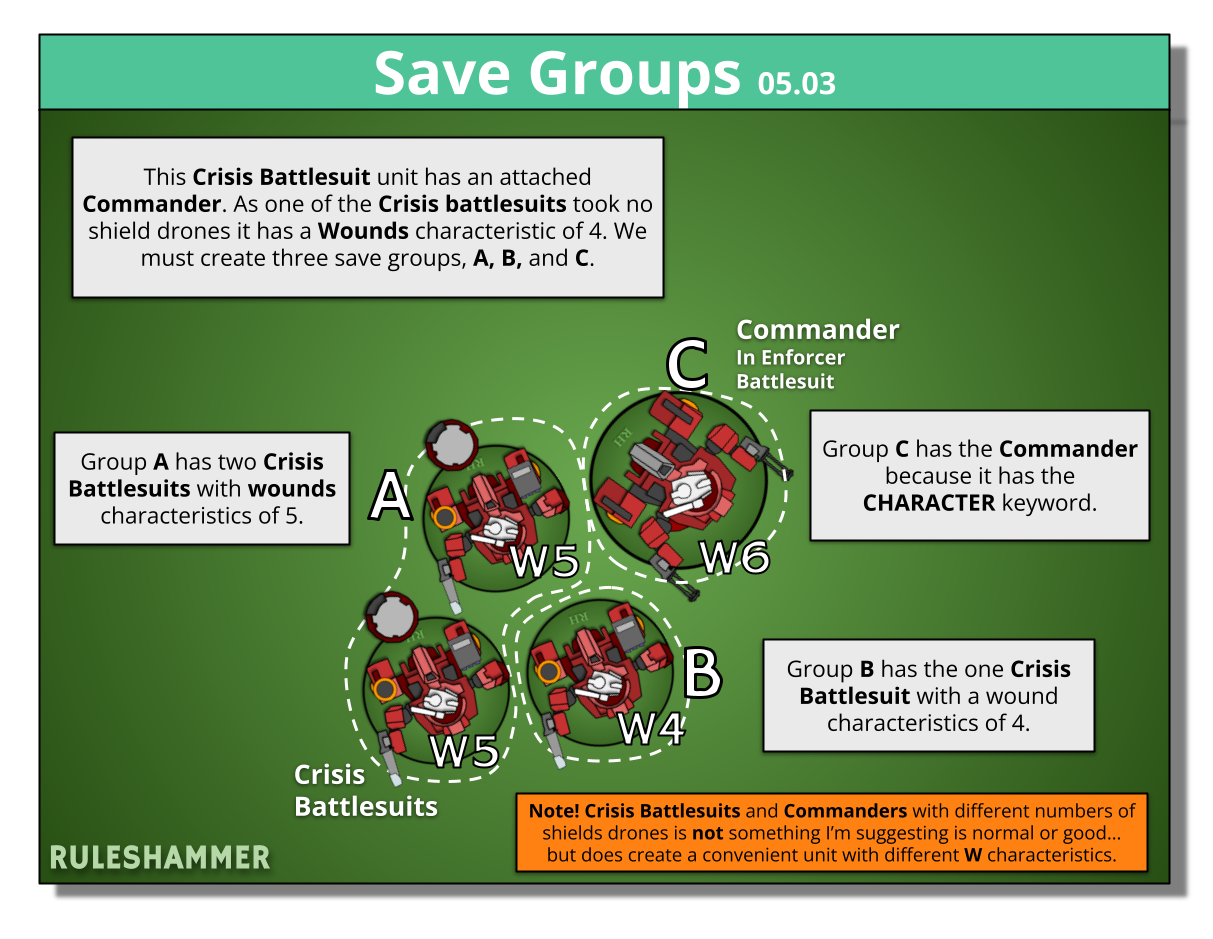
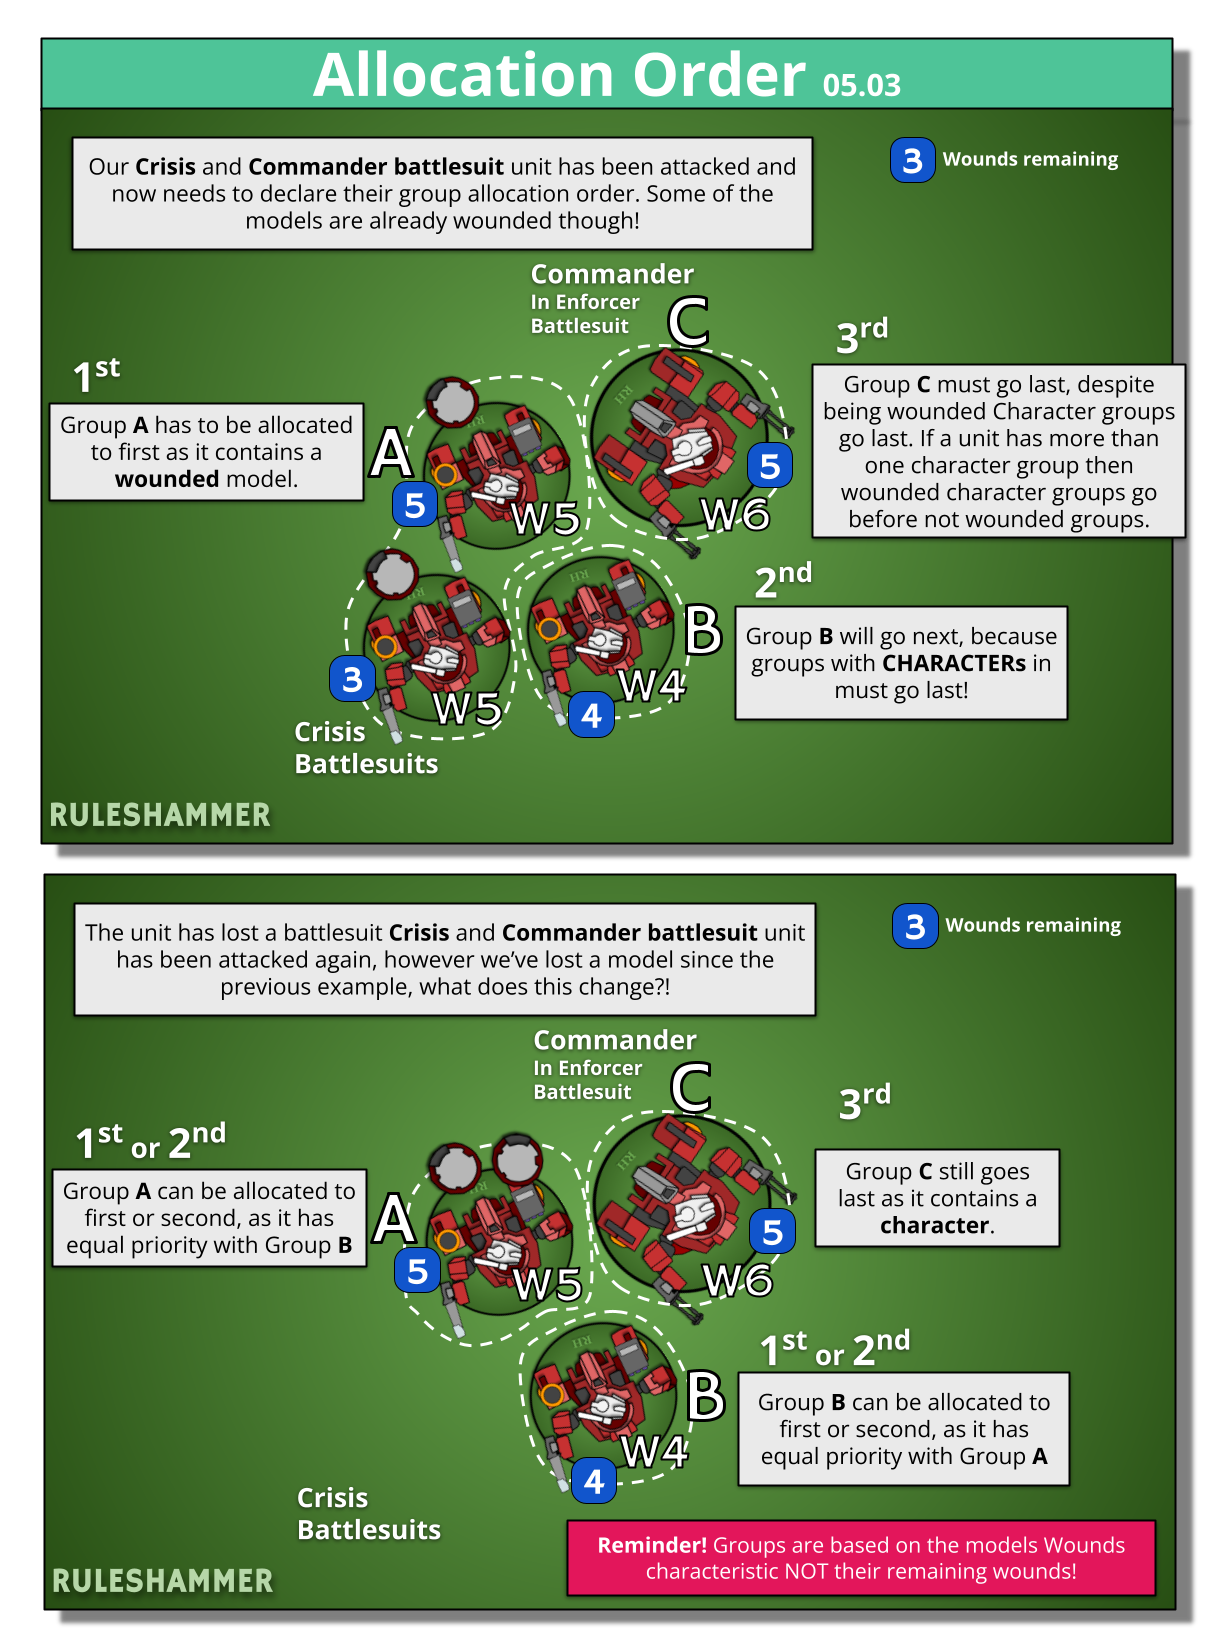
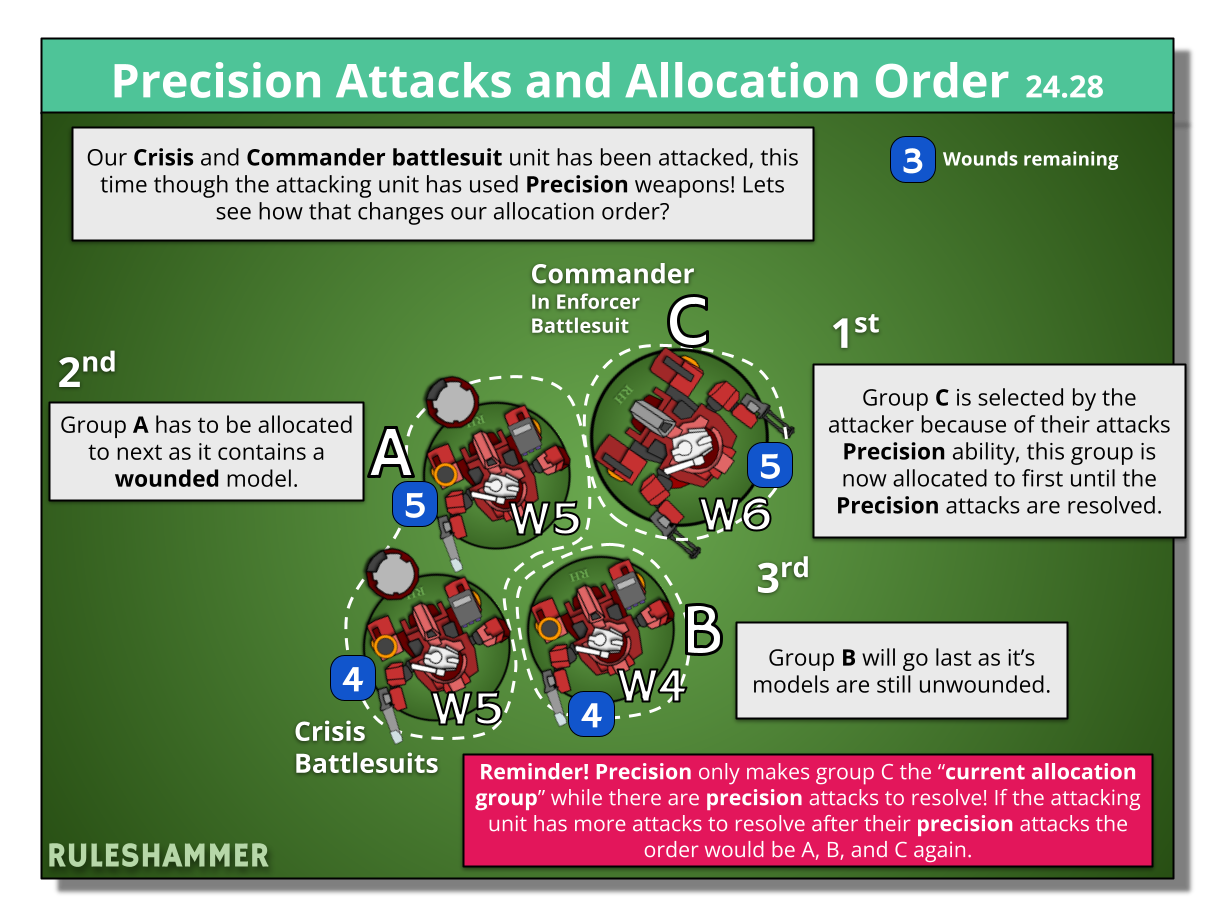
Precision 24.28
While resolving attacks made with one or more PRECISION weapons, at the start of the Allocation Order step, if any one of the attacking models can see a CHARACTER in the target unit, the active player can pick that character's group to become the current allocation group — so the wounds land on the character until that group is destroyed or the precision attacks are all resolved, after which normal allocation resumes.
- Change from 10th: only a single attacking model needs line of sight to the character, not all of them.
- You can only pick one CHARACTER group — if precision attacks remain after it dies, you don't get to jump to a second character.
Summary of attacking and rolling with intent :p. We're super smooth brained and it's easy to get excited and just chuck dice without being clear what each handful is for. Then the flow of the game is borked and we're all confused what's happening and suddenly we're in the fourth hour still on battle round 2. This is something we'll just get better at with time, but declaring what your rolling is good for you and whomever you're playing, keeping engaged and also tbh excitement to see what the roll outcomes are.
- Attacks — for random-attack weapons (flamers and the like), roll how many shots first.
- Hit — "hitting on 5s."
- Wound — "wounding on 4s."
- Save — "saving on 5s... shit I rolled SEVEN 1s"
Slow rolling:
- dX damage — for each failed save in order, roll the damage roll. Then if applicable:
- Feel No Pain — Remember that Feel No Pain rolls are PER DAMAGE, so if an attack has a Damage characteristic of 3 you need to roll a d6 for each of the 3 wounds it would otherwise inflict. If the attacks have dX random damage then wait for that roll before rolling FNP.
- Leadership / battleshock — 2D6 against Leadership. Slow it down and declare what unit you're testing.
Being intentional is faster overall — fewer re-dos, less brain fog.
Genestealer Cults example
Let's say Nick has 1 Purestrain Genestealer attached to his Patriarch left in the unit, and he's just failed 2 save rolls for a d6 damage weapon. Slow rolling: the first d6 is a 6, but that only kills the 1 Purestrain Genestealer and damage doesn't carry over between models. The next damage roll is a 1, so the Patriarch survives, having only taken 1 damage.
Invulnerable saves are no longer optional
Modifier order, finally tidied
Multiple modifiers resolve in a set order: set values first, then multiply, add, divide, subtract, rounding up at the end. What you'll notice: setting damage to 0 can't be undone by +1 damage; "halve damage" now applies after melta bonuses; and +1 OC buffs no longer rescue a battleshocked unit.
Playing with intent
"Playing by intent" is well-worn 40k etiquette (see Frontline Gaming): keep a running dialogue and declare what a move is for before you make it. It's a safety net against "gotcha" moments and the bad blood they breed — the same idea as rolling with intent above, scaled up from dice to the whole board. It's usually a <1-minute chat, not a formal ritual:
- State the intent. Say what you're trying to do and how — "the intent is this unit ends fully hidden and outside 15″ of a move-and-shoot." Move models with purpose and explain where they're going and what they gain.
- Agree, and hold each other to it. "Do you agree with that?" If they don't, work it out together — or
grab a judgeroll a dice. Once agreed, that's the end of it; don't walk your word back. Sometimes a play just can't work how you wanted, and that's fine. - Execute within the intent. Keep the play inside what you discussed and keep narrating as you go. If something genuinely new develops, react to it — that's not a "gotcha."
Heads-up on gotcha abilities
Players are of course not't responsible for telling you exactly what they're going to do — "I'm going to Rapid Ingress and Heroic Intervention" — and you shouldn't expect them to. But they are slightly responsible for saying they could do that. In general, just little reminders of "oh btw this unit can do X, so be aware of that." We're under no obligation to execute said moves, but being aware of each other's units and abilities is just a little more fair and fun.
A few from our own group:
Grey Knights — Colin
Colin's Banishers detachment can let him teleport a unit away if an enemy moves within 9″. One thing Colin and I did re this: instead of Deep Striking at 8″, the reminder was to let me set up my units at 9″ instead, so the unit doesn't trigger the move ability. No "gotcha, soz, now I move my units to be hidden."
T'au — Ed
Ed's Ghostkeel can use 2 stealth drones to completely ignore a single attack's damage.
Orks — Matt
Matt's Kommandos cannot be targeted with fire Overwatch.
Genestealer Cults — Nick
Nick has a detachment that can uppy-downy his Purestrain Genestealers, and reduce/increase hidden detection ranges.
Other Rules
Stratagems
The change stops hyper-buffing a single elite unit and spreads CP spending more evenly across your roster. It also interacts with the Doubles rules: the one-per-unit limit applies across the whole force, so your teammate can't spend a stratagem on a unit you already targeted that phase.
Hazard rolls
A new shared mechanic. HAZARDOUS weapons, desperate escapes and emergency disembarks all force a Hazard roll: roll a D6, and on a 1–2 the model takes a mortal wound (1 mortal wound for most, 3 for a MONSTER or VEHICLE). It triggers twice as often as 10th's Hazardous so more care may be needed(?).
Actions are back in the core rules
Actions are codified again, each with a clear structure. To start one a unit needs at least OC 1, must be on the battlefield, can't be an aircraft or fortification, and can't have advanced or fallen back. Key point: shooting and actions are mutually exclusive for the turn — shoot and you can't start an action; start an action and you can't shoot or charge.
Command phase
Familiar shape — gather CP, use abilities, test morale — but battleshock has teeth now, and it's the biggest change in the phase.
Tabletop Battles: Command Phase deep dive
New: every phase has a Start and End step
The Command phase is where you first meet a structure now shared by every phase: an explicit Start of Phase and End of Phase step for triggered/activated abilities, run under the new sequencing rules. In each sub-step the active player resolves all their mandatory rules (in an order they choose), then all their optional ones, and only then does the opposing player do the same.
One Command-phase-specific wrinkle: the mission-scoring sub-step always runs after all other End-of-Phase effects, so scoring is judged on the final board state once every ability has resolved.
Battleshock: easier to get, harder to lose
Two-model units and lone multi-wound models can no longer dodge the test. And because recovery isn't automatic — with most Leadership values at 6–8 — a unit can stay shocked for several turns. Insane Bravery still auto-passes once per game, but not on a unit that's already shocked.
So anything that inflicts battleshock at range jumps in value, anything that removes it does too, and a forced emergency disembark (which auto-shocks the unit) is a nastier punishment for blown-up transports.
Orks example
Big mobs whittled to half feel this immediately — a shocked unit of Boyz on an objective contributes OC — and simply isn't holding it. With no guaranteed bounce-back, keeping a mob above half-strength is now a real priority.
Movement phase
Two changes to how units occupy space — coherency and engagement — are among the biggest adjustments for returning players. Fall Back, Flying, Transports and Reserves all changed too, but a lot of it is streamlining.
Tabletop Battles: Movement Phase deep dive
Coherency: the 9″ rule
Conga lines are dead, and even 5-model units take up less room. That's a real hit to hordes (less move-blocking, harder to screen the whole table) — though some mid-sized melee units like it, as they can push out in several directions to keep charge lanes open.
Engagement range — and moving through it
Engagement is now 2″ horizontally (still 5″ vertically). The twist: with standard move types you can move through an enemy's engagement range freely, as long as you end outside it. A model is ENGAGED if within range of an enemy; a unit is Engaged if any of its models are, otherwise UNENGAGED. Because 2″ reaches a long way, even a small unit can now wall off an approach to an objective — so abilities that let you shoot and then move climb in value.
Moves are a template — and pivots are free
Most things are now written as a type of move with a shared template: a Before / While / After moving structure (coherency is always checked in the After step), and a max distance shown in a grey bar at the top of the card — easy to skim past, so look for it. All movement resolves as straight lines and pivots, and the big change is that pivoting costs no movement. On a large model that can quietly add 1–2″ of reach if its wider axis faces the foe.
Fall Back: Ordered Retreat vs Desperate Escape
Fall Back — one of only two moves you can make while Engaged (the other is Remain Stationary) — is now a modal choice:
- Ordered Retreat — the "clean" version, if the unit is not battle-shocked. Move up to M″; afterwards it can't Shoot, act, or Charge this turn.
- Desperate Escape — forced if you're battle-shocked, or need to move through an enemy model to get out. Every model makes a Hazard roll, and (if not already shocked) the unit then takes a battle-shock test.
Less directly lethal to multi-wound models than 10th, but the whole unit rolls Hazards even if only one model needed to escape, and the battle-shock test can wreck your plans — so wrapping enemy models to force a Desperate Escape is scary again.
Flying: Take to the Skies
FLY now does nothing at baseline. To jump over models and terrain a flyer must Take to the Skies on a Normal/Advance/Fall Back/Charge move: a flat −2″ to its distance, after which it ignores all enemy models, terrain, and vertical distance for that move. A big boost for MONSTER/VEHICLE/Mounted flyers pushing out of terrain fast; a mild nerf for Infantry, who used to pass through walls for free and now pay 2″ to hop models.
Overwatch moved here
Overwatch now resolves only in the End of the Movement phase step — not in the Charge phase, not the instant a unit moves or arrives — and no longer needs to target a unit that moved. Still 6s to hit within 24″, but with no re-rolls (nudging Torrent up). Net effect: get your defensive shooting in during movement; there's no last-second reaction as a charge comes in.
Reserves & Ingress
- No separate Reinforcements step — reserve units are eligible from the start of the phase and make an Ingress Move to arrive, at any point in the phase.
- Default Ingress: set up in coherency, >8″ from all enemies (tightened from 9″), wholly within 6″ of a board edge, and out of the enemy deployment zone before Battle Round 3. Deep Strike just removes the edge/zone limits.
- No move after Ingress — arrive, and you can't make any move until your next Charge phase. No more drop-in, shoot, and scoot back behind a wall.
- Strategic Reserves is a single 1000pt cap (or half your army), no split from Deep Strike. Nothing arrives before Battle Round 2, and anything still in Strategic Reserves at the end of Round 3 is destroyed.
Transports
Embarking gained a key limit: you cannot embark if the unit was set up this turn — which globally kills "fire and fade" back into a transport, since disembarking is a set-up. Disembark is now a modal move (and using it uses up your move for the turn):
- Rapid Disembark — after the transport made a Normal or Ingress move. Set up wholly within 3″; the unit can't Charge this turn.
- Tactical Disembark — before the transport moves, or if it Remained Stationary. Set up within 3″, then immediately make a Normal or Advance move (the vehicle is still in its start position, so plan your staging).
- Combat Disembark (new) — only when neither above works (usually enemy engagement blocks 3″). Set up within 6″, possibly in engagement range of enemies engaged with the transport — but the whole unit makes Hazard rolls and takes a battle-shock test.
Shooting phase
The mechanics of picking targets and rolling to hit and wound are familiar. The big shifts that touch shooting are covered elsewhere — this is what's left that's specific to the phase.
Tabletop Battles: Attacks & Shooting Phase deep dive
Where the big changes live
- Saves & damage allocation — the rebuilt save-group system (batch rolling by default) is in Basic Rules, since it applies to fighting too.
- Cover — now −1 to hit and judged per attacking model; see Terrain & cover.
- Overwatch — defensive shooting now only resolves in the enemy Movement phase.
Four shooting modes
Every eligible unit picks one mode; all of them stop you starting an Action afterwards.
- Normal — full ranged attacks. Only if the unit did not Advance and is not Engaged.
- Assault — if the unit Advanced and is not Engaged, it may fire only its Assault weapons. Same as recent editions, just formalised as a mode.
- Close-Quarters — shooting while Engaged (below).
- Indirect — for Indirect Fire weapons (below); unit must be unengaged and not have Advanced.
Indirect fire nerfed
Indirect weapons remain deliberately weak: the target counts as having cover (−1 to hit), you can never hit better than a 4+, you get no re-rolls, and you only reach that 4+ if a friendly unit can see the target and your shooter stayed still — otherwise it's 6s. It can still target Hidden units, but landing meaningful damage through it is hard.
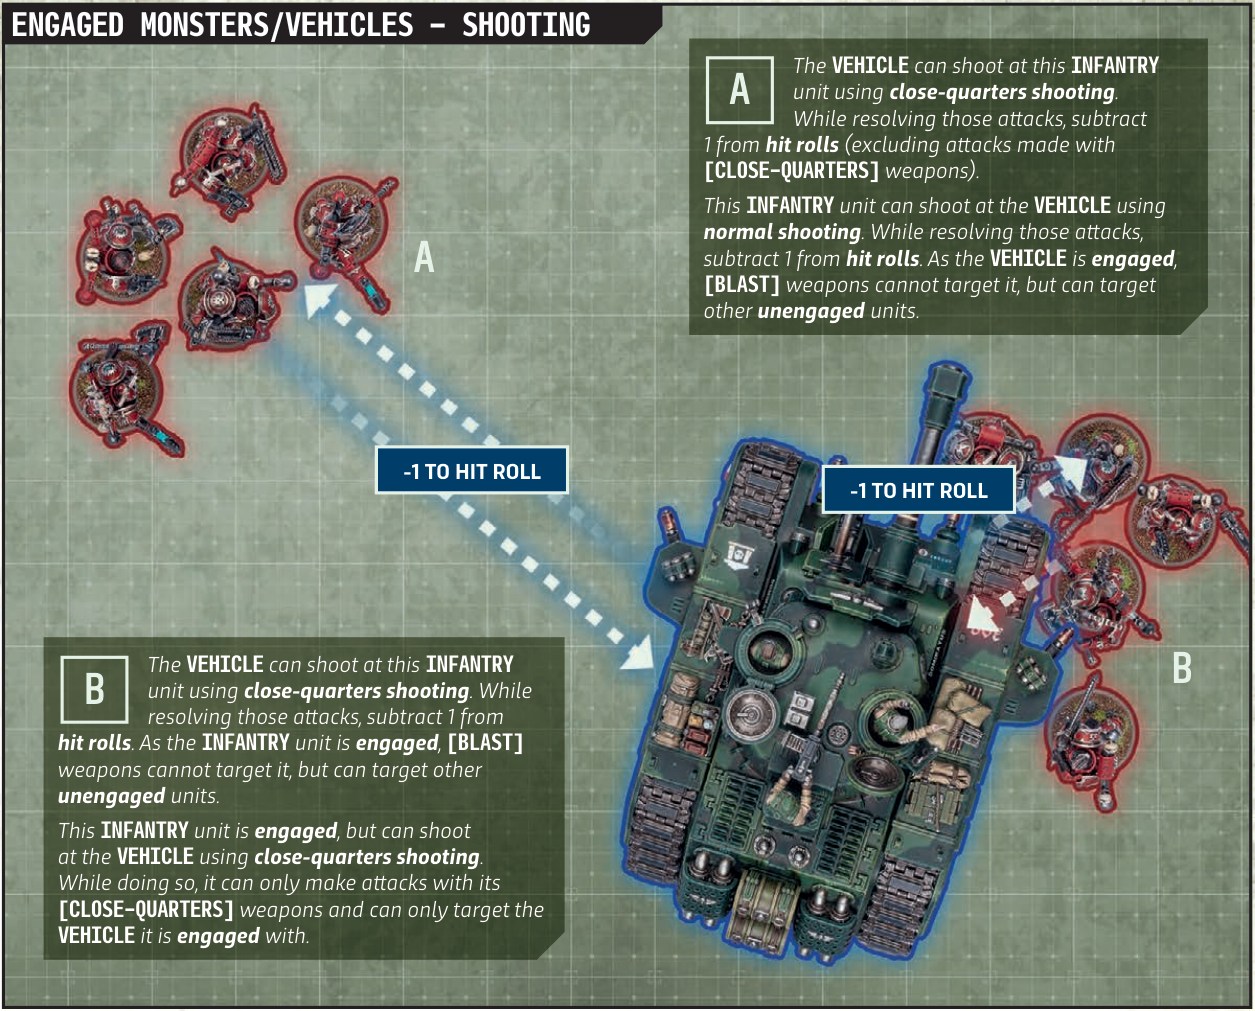
Close-Quarters Shooting and Monsters/Vehicles
The Close-Quarters keyword replaces Pistol as the way to shoot while engaged in melee. This is where the 10th Edition "Big guns never tire" rule now lives. A unit may shoot if all of the following apply:
- Engaged and did not make an Advance move this turn.
- Has one or more Close-Quarters weapons, or is a MONSTER/VEHICLE unit.
Charge phase
Charging is simpler and swingier — you roll first and then decide what you can reach.
Ruleshammer: Charge Phase <- I encourage reading this one fully.
Main Change: Roll first, then pick targets
- Declare Charge — not eligible if:
- Engaged
- Made an Advance or Fall Back move this turn
- Make charge roll (2D6)
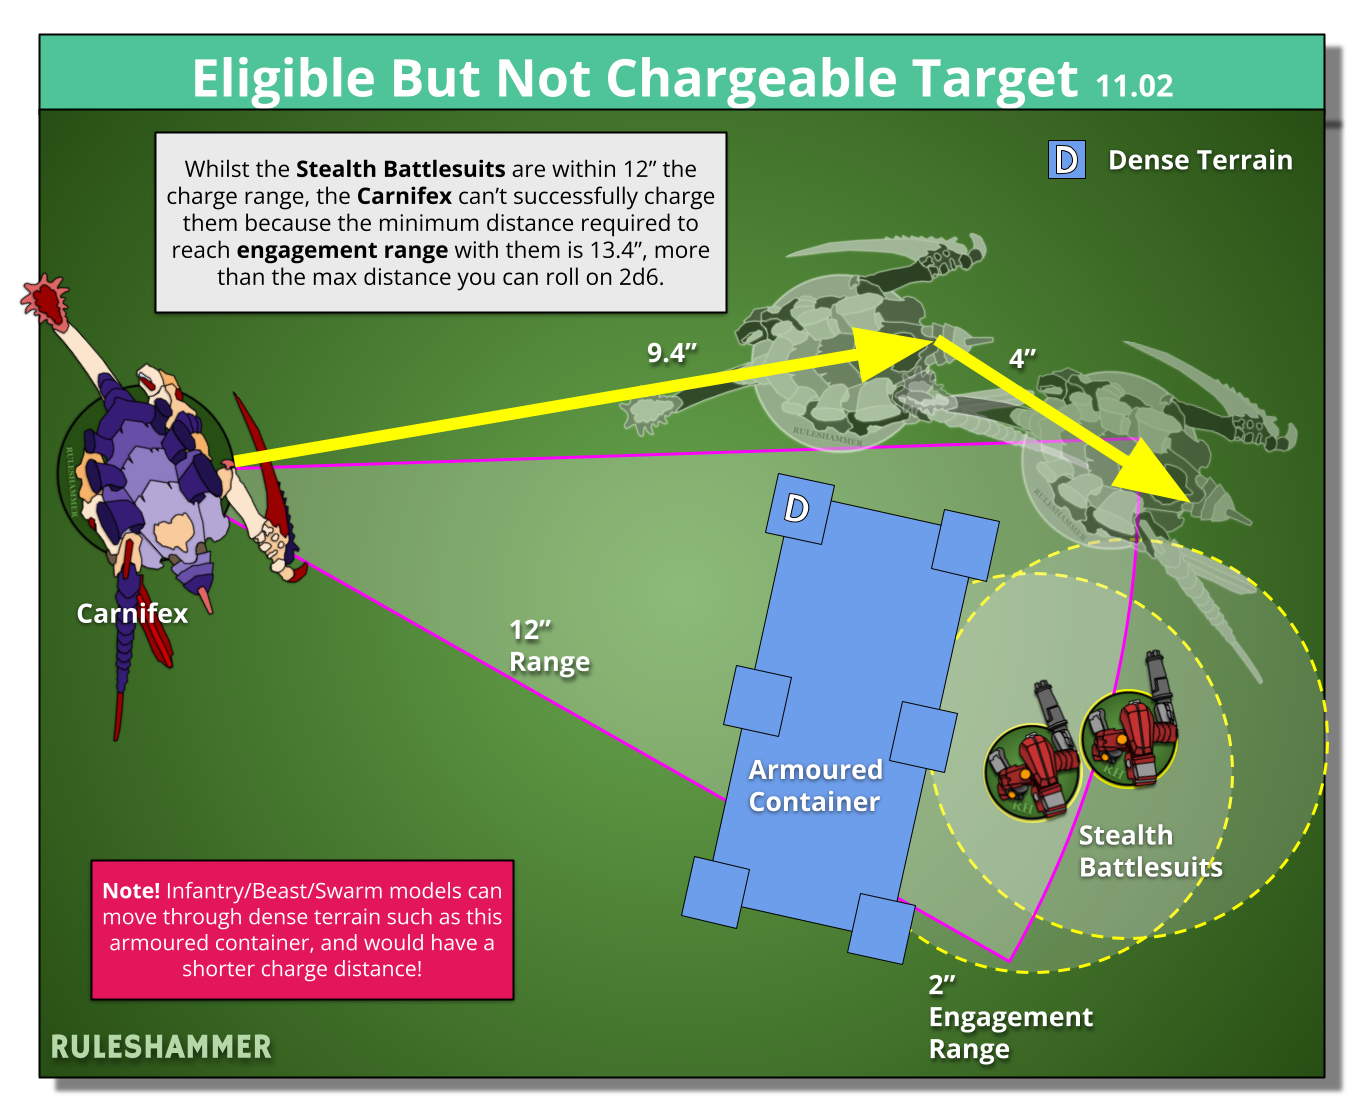
- Attempt charge — make a valid charge move. See below figure for an example where the charge roll can succeed but the charge is not possible.
The charge move
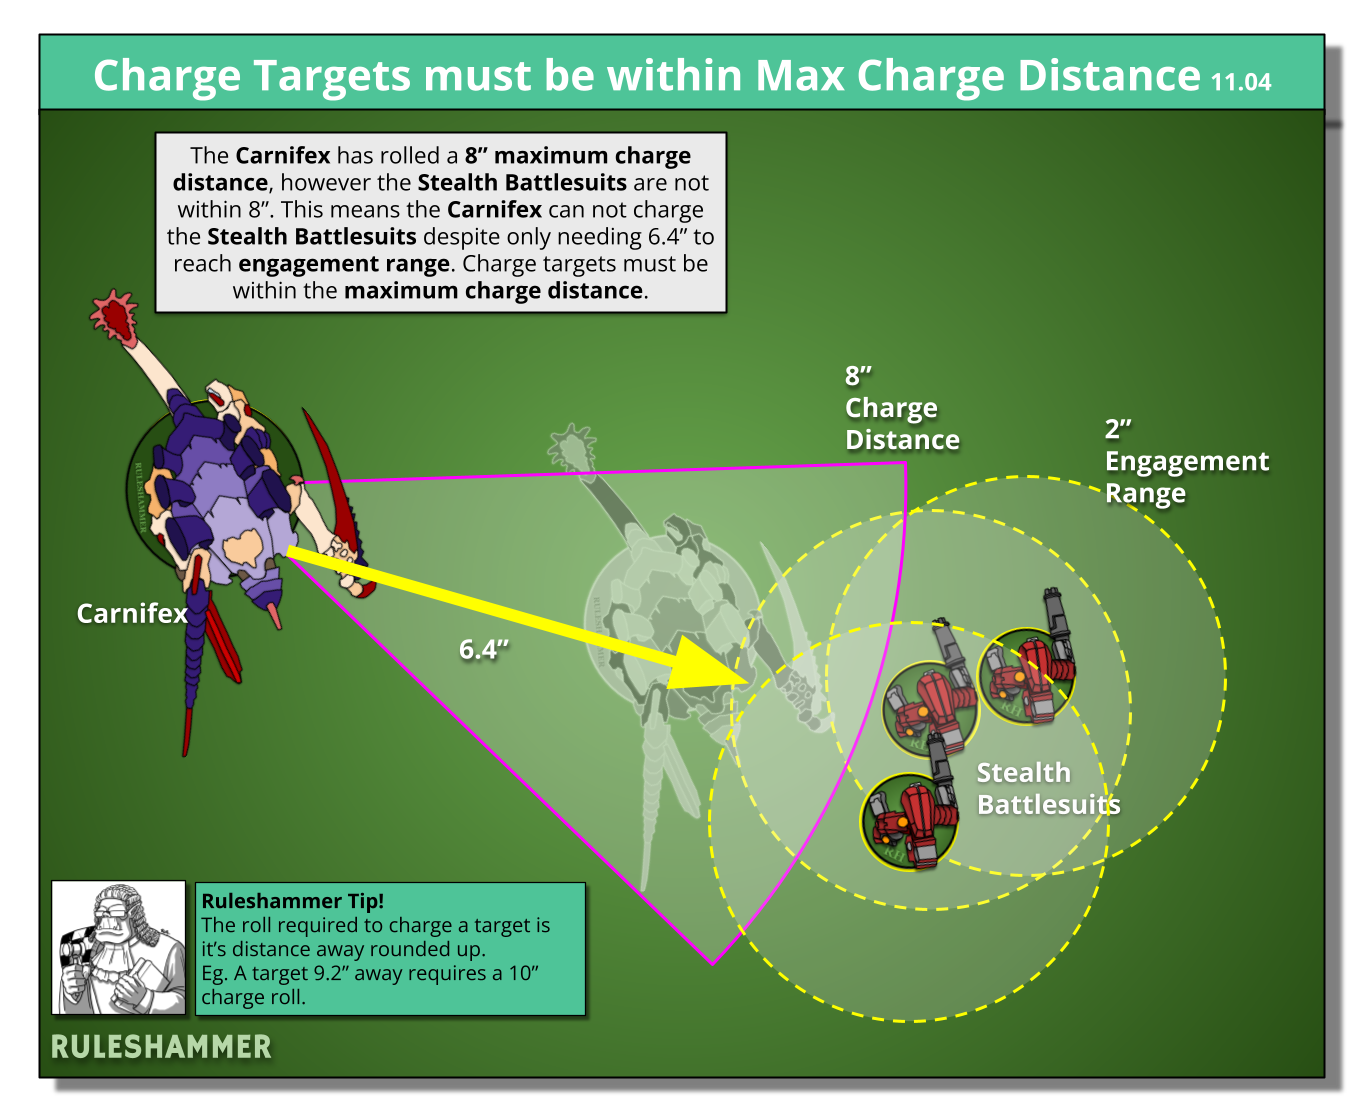
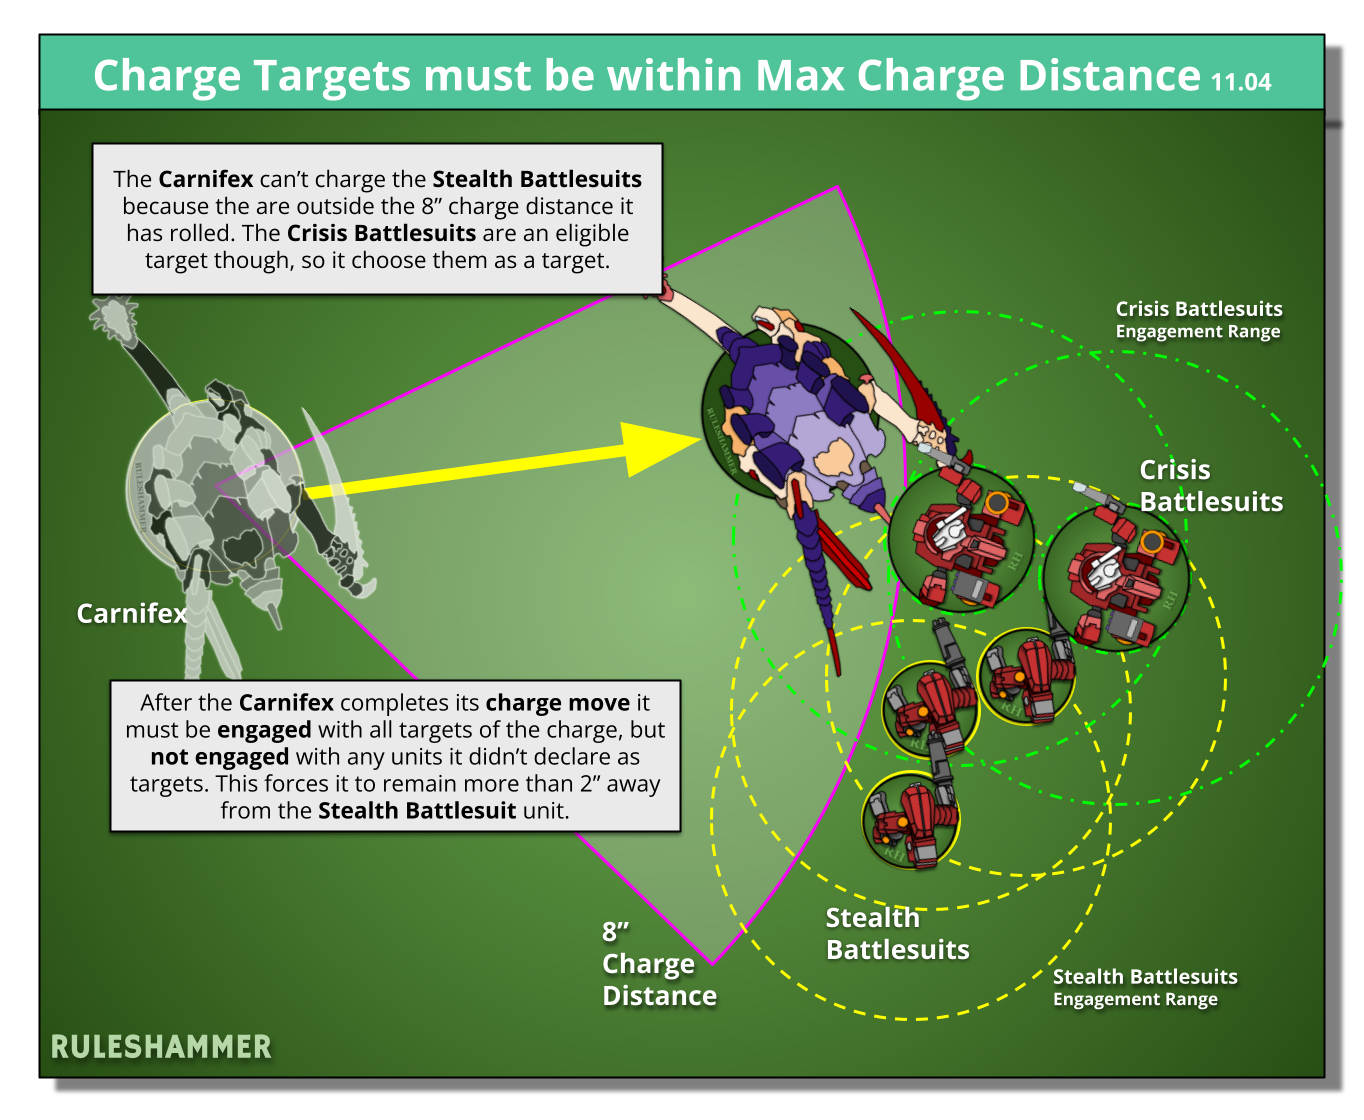
Before moving: Select one or more enemy units that are within 12” of your unit and within the maximum distance of your unit — until the end of this move, each of those enemy units is a charge target.
While moving:
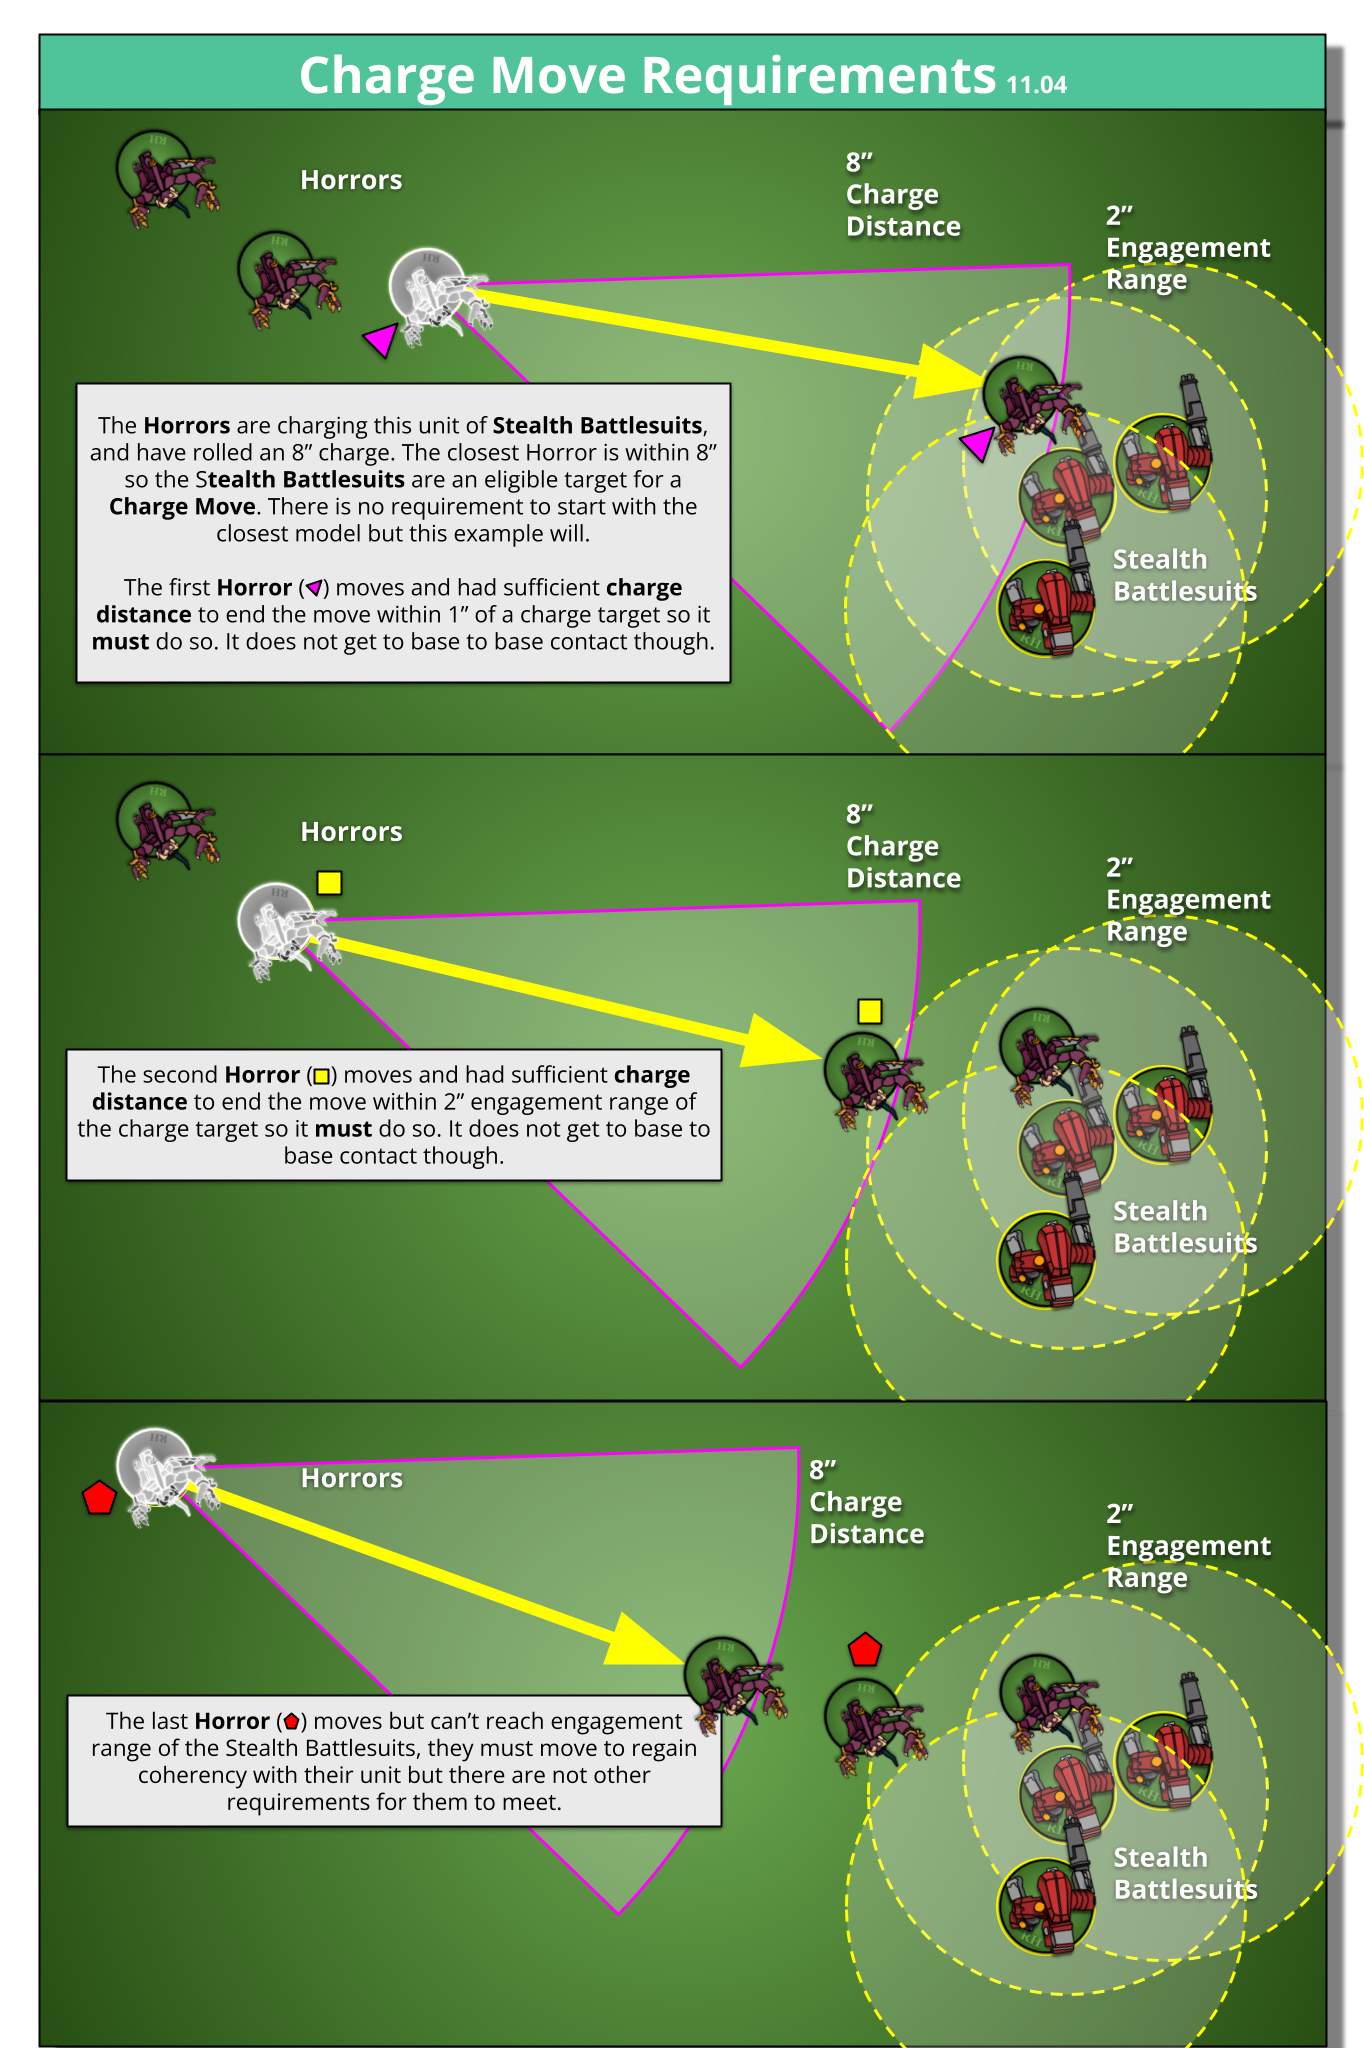
- Each model must end its move closer to one or more charge targets.
- Each model that can end its move within 1” of one or more charge targets must do so.
- Each model that can end its move engaged with one or more charge targets must do so.
After moving:
- Your unit must be engaged with all of the charge targets.
- Your unit cannot be engaged with one or more enemy units that are not charge targets.
- Until the end of the turn, each model in your unit has the Fights First ability (24.13).
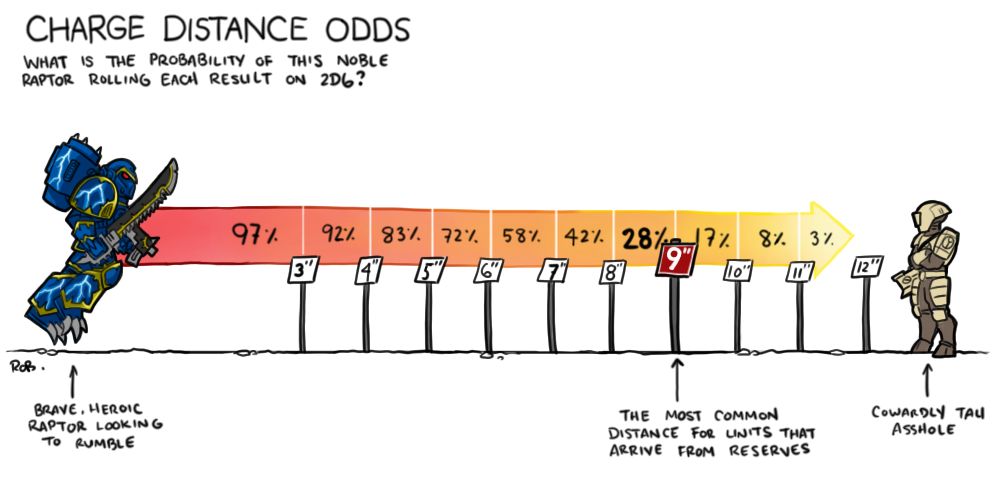
Buffed Heroic Intervention
The Heroic Intervention Stratagem now happens at the end of the phase, and has been considerably buffed in 11th Edition. The standard 1CP version of this still only lets you counter-charge enemy units that have charged, but no longer has a 6” cap on it, so you can go for a big reach if it’s your only hope. You also resolve the charge same as above, so if multiple enemies have ended charges within range, you can tag both of them, or roll the dice to see if you hit a stretch goal, and select a consolation target if not.
There’s also now a 2CP version that allows them to charge any units, but does cap their charge distance at 6”. This means you can no longer safely score by running up to a high threat melee unit and standing innocently on an objective in front of them, at least not if the opponent has space Command Points.
Fight phase
The biggest overhaul of any part of the turn — it shakes up when and how units move and who gets to fight. Combat movement that felt too constrained in 10th opens back up, and careful sequencing of fights can create huge power plays.
Tabletop Battles: Charge & Fight Phases deep dive
Who fights first: the big change
Step 1 — everyone piles in at once
The first action after start-of-phase rules is a single shared Pile-In step. Every unit that is engaged or that made a charge move this turn is eligible. The active player piles in with all their eligible units first, then the opposing player does all of theirs (and may find their options constrained by then).
A Pile-In lets each model move up to 3″. Before moving you pick your Pile-In targets; each model must end closer to — and if possible engaged with — the closest target. Which targets you can pick depends on your situation:
- Already engaged: you can only (and must) select every unit you are currently engaged with. You can't slingshot off toward a unit you didn't charge.
- Not engaged (rare here, but matters for Overrun): pick one or more units within 5″ as targets — and there's no "must go for the closest" rule, so you can concentrate on one target.
As in 10th, models already in base contact can't Pile-In. There's no obligation to base your foe any more, but the active player will often want to — basing an enemy model restricts what that unit can do on its own Pile-In.
Step 2 — who is eligible to fight
After all Pile-Ins, the Fight step begins. Eligible to fight: everything that charged, everything engaged, and anything that starts this step eligible stays eligible even if it later becomes unengaged.
- A unit dragged out of engagement as its foes die still gets to fight — via an Overrun Fight (below). No more losing your swings because the enemy melted away.
- Which models can attack is decided purely by the 2″ engagement range — in range, you swing; out of range, tough luck. Multiple ranks still fight, but a giant base can no longer "reach through" its own front model.
Overrun Fight
When a unit is selected to fight but is not engaged — or started the step unengaged and only got engaged since (e.g. something pulled it in, or Consolidation) — it makes an Overrun Fight: an extra Pile-In move before its attacks, to tag new foes.
This is where melee armies get scary. Charge two alpha threats into one target; the first swings and wipes it, then the second — now freed up — gets an additional Pile-In to reach fresh enemies and keep killing. Abilities that grant 6″ Pile-Ins amplify this enormously.
Selecting units to fight
- Players alternate selecting units, starting with the active player; a player with no eligible units must pass.
- All Fights First units go first. If only one player has them, they pick them all in a row while the opponent just passes.
- Alternation then continues straight into normal fighters — if you pick the last Fights First unit, your opponent picks the first normal one.
- If a Fights First unit becomes eligible later (via Overrun/Consolidation) and hasn't fought, the step reverts to clearing Fights First units again first.
Because the active player picks first, if you charged nothing (and so have no Fights First units) your first pick is a normal unit — a way to bail a unit out of trouble, at the cost of opening other fights.
Making attacks
Works like shooting. The differences: each model can split its attacks freely between any targets it is engaged with, and you must use all the attacks you have.
Step 3 — Consolidation (three modes)
Once both players pass, every unit that was eligible to fight consolidates, one at a time, starting with the active player's units. It's modal — you use whichever applies:
- Ongoing Consolidation (currently engaged): required if the unit is engaged at the start of the step. Target every engaged enemy; each model not in base contact moves up to 3″, ending closer to the nearest target and engaged if it can.
- Engaging Consolidation (not engaged, but within 3″ of an enemy): the unit must select this mode, pick one or more of those enemies and move up to 3″ to end engaged with them all. Any target that hasn't fought yet immediately becomes eligible and fights — so you can trigger extra fights, including Overrun Fights, right here.
- Objective Consolidation (only if neither of the above applies, but within 3″ of an objective): move each model up to 3″, ending within range of the objective — or closer if it can't reach. Already on the terrain? You can shuffle up to 3″ freely on it.
Orks example
A green tide's favourite phase. The flat 2″ range gets far more Boyz swinging than 10th's basing allowed, and piling in all at once — then Consolidating — makes it easy to keep a big mob locked into combat, safe from shooting and doing what they do best. Charging two mobs into one target sets up Overrun Fights: wipe it with the first, and the second piles in again to reach the next victim.
Event companions & playing 2v2
GW's 11th-edition organised-play rules arrived as four documents: the core Event Companion plus separate Doubles, Teams, and Dominatus companions. Our first 2,000-point game is a 2v2, so the Event Companion and the Doubles Companion are the two that matter to us right now.
What's in the Event Companion
The Warhammer Event Companion is the 11th-edition replacement for the old Tournament Organiser's Companion — the baseline document for competitive 40k, from local leagues up to world championships. It holds four things:
- The pregame sequence — how you set a game up before the first turn.
- Additional errata and FAQs for the Chapter Approved missions.
- Mission and terrain layouts for every mission combination.
- Base-size guidelines for every unit.
Layouts, designer's notes and errata
- Layouts — there are three sets (A, B, C) for each mission matchup, 45 in total. They aren't all unique, but you rotate through A/B/C during an event so repeated matchups feel fresh.
- Designer's notes pin down what several rules terms mean: Cumulative, or, leaves the battlefield, When drawn, and Up to a limit.
- Errata / FAQ tidy up the scoring on Death Trap, Surveil the Foe and Vital Link.
What changes for a 2v2 Doubles game
The Doubles Companion is brand new for 11th edition — the first official Doubles rules GW has ever published. The core idea: your team builds as one big army made of two components, so once-per-army limits are shared across both lists.
Army construction in Doubles
- You cannot double up on EPIC HERO units, enhancements, or any other once-per-army items across the two armies.
- A particular Upgrade can appear more than once inside one player's own army, but not in both armies on the team.
- Each team selects one CHARACTER, from either army, to be the team's WARLORD — one Warlord for the whole team, not one per army.
- Rules that scale with army size are measured per player, not per team. In our 2,000-point 2v2 each player fields a 1,000-point (Incursion) army, so any "based on the size of your army" allowance uses that 1,000 — not the 2,000-point team total.
Unified force vs. force of convenience
This is the biggest in-game change, and it governs how your two armies interact:
- In a unified force (both armies share all the same faction keywords — for ADEPTUS ASTARTES, the two armies don't need the same Chapter keyword), your teammate's models count as friendly for rules and auras, the force uses its army rule as a single army (a Drukhari force shares one pain-token pool), and units can embark in each other's Transports.
- In a force of convenience (anything else), your teammate's units are neither friendly nor enemy. Note that IMPERIUM falls here — Marines + Sisters is a force of convenience, not a unified force.
- Detachment rules only cross over if both players took the same detachment. In a unified force where both chose the same detachment, its rules apply to the whole force as if it were one army. Otherwise — different detachments, or any force of convenience — each player's detachment rules only affect their own army and the enemy, so you can't target your teammate's units with your stratagems.
Command points in Doubles
The team gains 1 CP per battle round and can't generate more than 1 extra. CP is a single shared pool, and Stratagem limits apply to the whole force rather than to each player — so you can't, for example, use Insane Bravery twice by having each player fire it once.
Our group's 2v2 setup
We're playing Orks + Genestealer Cults vs. Grey Knights + T'au. Neither pairing shares faction keywords, so both teams are certainly forces of convenience — your abilities and army rule only touch your own army and the enemy, never your teammate's units. What you do share is the CP pool and a single team Warlord — one CHARACTER chosen from either of your two armies — so agree up front on who carries it and how you'll spend CP. And remember army-size allowances key off each player's own 1,000 points, not the 2,000 team total.
Useful Links
- GDM — Rules, Missions, and Force Dispositions
- Tabletop Battles — 11th Edition
- Ruleshammer — Terrain Guide
- Ruleshammer — Hidden & Gone to Ground Guide
- Ruleshammer — Save Groups, Precision, and Feel No Pain
- Ruleshammer — Charge Phase
- Ruleshammer — Fight Phase
- Ruleshammer — Shooting: Range, Line of Sight, and Visibility
- Hammer of Math — Charge Basics in 11th Edition
- Hammer of Math — Coherency: Circles and Triangles